“Giving the face.” In the world of riding, it describes the point when your horse softens in the jaw and flexes willingly at the poll in response to light pressure on both reins. It’s also called “coming soft to the pull,” and it’s the single most important thing to teach your horse.
Why? Because it’s how you and your horse both know that you are in control. By softening through the jaw and flexing at the poll, vertically or side-to-side, your horse says, “I’m yours. what do you want me to do?”
By contrast, if he even thinks that “putting his head on upside down” (that is, lifting his head and bracing with his neck) is an option, then you don’t have control of his mind or his body. And that can be downright scary on a thousand-pound animal!
Getting a horse to flex at the poll and soften in the jaw is relatively easy, but keeping him that way at all speeds, through transitions, and in all maneuvers?that is a lifelong endeavor.
I’m going to show you how to get started. I’ll demonstrate this flexing at a standstill, walk, trot, and lope, plus give you tips for making it work long-term.
Your Goal
Ultimately, your horse should stay soft and flexed in response to your picking up the reins, so that his face is roughly at the vertical (more or less perpendicular to the ground). He shouldn’t be so flexed that his face comes far behind the vertical, with his chin tucking toward his chest.
As he gets better at flexing and dropping his head, he should also soften in the jaw, which means his mouth will feel soft?not braced or pulling?on your hand. As he softens to you, his face may come slightly behind the vertical at times. ideally, he’ll ultimately remain soft even with a little slack in the reins.
If you ask him the way I’m going to describe, using your legs to keep his hind end engaged, he should over time also begin to round his topline, reaching far up underneath himself with his hind legs (what I call “shortening the wheelbase”). He should stay relaxed, rather than become agitated. Eventually, you’ll feel him getting better balanced under you.
From The Ground
Outfit your horse in a snaffle bit and saddle, then stand facing him, just off to one side so you’re not directly in front. Grasp a rein just behind the bit with each hand, and apply gentle backward pressure. If need be, slide the bit gently from side to side (but avoid a harsh “see-sawing” effect). The instant your horse responds by bringing his nose back and/or down, release the pressure and praise him. It’s more important to get your horse to respond willingly numerous times than to hold him longer in the flexion.
Timing is critically important. Your horse learns from the release of pressure (the reward), not the application of it (the pull). Also, he assumes what he was doing immediately before a reward is what he’s being rewarded for. So to reward that very first “give,” release pressure and praise him the instant you feel him respond.
Continue asking, and try to get a little more flexion as your horse begins to understand the drill.
Once he’s responding well, grasp the near rein only and draw it back and up, in a pull-and-release fashion, toward the saddle horn (to approximate the angle of your pull when you’re mounted). When your horse’s head is partway around, hold the rein still and wait for him to give that last little bit on his own. The instant he does, drop the rein, releasing all pressure, and praise him.
Repeat, trying for a more willing response and a bit more bend as he comes to understand what you want. Then move to the other side and flex him similarly in that direction.
Repeat these flexing exercises before every riding session for a while.
Mounted, At A Standstill
After your horse is flexing well from the ground, mount and ask him to flex at a standstill. Take the same approach; that is, with your hands about 12 to 24 inches apart, first draw back gently but firmly with both reins, drawing the bit softly from side to side if need be to get your horse to flex at the poll, drop his head, and soften.
Release pressure and praise him the instant he responds (make sure he’s actually giving to you?that is, softening to your hand?and not just dropping his head), then repeat.
To ask for the lateral flexion, slide your hand halfway down one rein, then draw your hand back in a pull-and-release motion toward your waist. Try to get your horse to volunteer that last little bit of bend, then pitch the rein loose and praise him. Repeat several times, then do the same exercise with the other rein.
Repeat these flexing exercises each time you mount and before you begin your riding sessions.
At A Walk, Trot, Lope
When your horse starts getting solid in his flexing at a standstill, try it at a walk, but with one key difference: in motion, always use your legs in concert with your hands. This keeps him moving forward (rather than just slowing down) and, eventually, encourages his hind legs to reach well up underneath him.
Start on a straight line. Walk him forward, and as you ask him to flex by exerting pressure on both reins (just as you did at the standstill and from the ground), keep your lower legs in a neutral position (that is, at or just behind the cinch) with as much pressure as necessary to keep him moving forward at the same pace.
As you ask for flexion to the side, move him onto a small circle (say, about 20 feet in diameter), using your inside leg at the cinch to encourage him to bend through his body as your inside rein asks him to flex his neck to the inside. The bend in his neck should enable you to see just the corner of his eye.
When he’s responding well at a walk, try it at a trot, then a lope, using the same approach (you’ll need slightly larger circles at the faster gaits). Remember?you’re using your legs to create impulsion up into the bridle.
A good exercise to combine all the learning focuses on transitions, which are a great place to work on flexion. So practice getting and keeping flexion going from a trot to a lope to a trot, then down to a walk for a step or two, then stop and back up. Strive for softness in the transitions?especially the downward ones, such as from a lope to a trot and a trot to a walk.
Mix it all up and practice a lot, and you’ll be well rewarded as your horse becomes softer, lighter, more responsive, and better balanced overall.
To ask your horse to give his face from the ground, stand next to his head and grasp the reins just behind the bit, applying gentle backward pressure. The instant he responds, by bringing his nose back and down, as my mare has here, release the pressure and reward him.
At a walk, set your hands lightly and bump with both legs at the cinch to bring your horse’s face to the vertical. When he softens to your hand as my mare is here–note the slack in the rein–his face may come slightly behind the vertical.
This shows how not to ask your horse to give his face. If your hands keep pulling when your horse gives to, and/or if you fail to simultaneously use enough leg as you “hold” with the reins, his head will come too far behind the vertical, like this.
At a trot, first use your legs at the cinch to move your horse forward with impulsion. Here, my mare is moving nicely forward, but I’ve not yet asked her to give her face.
At a forward trot, “ask” for the flexion with a soft but steady “holding” of your hands, while keeping your legs on your horse’s sides, Here my mare is beginning to give just a little.
Your goal is for our horse to maintain the flexion on a loose or very light rein. Here my mare is beginning to get the idea–note how she’s maintaining a slight flexion at the poll on a soft rein.
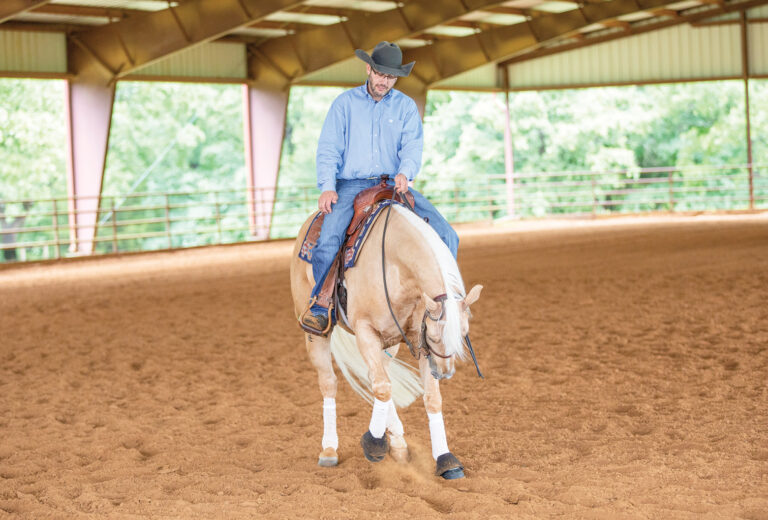
Use the same driving, holding cues for flexion at the lope. I’m using both legs to drive my mare forward, while my hands hold gently to create a “wall” that asks for softening.
The pleasing result: My mare is flexing beautifully at the poll, rounding through her back and topline, and reaching well underneath herself with her hind legs all on a soft rein.
It Ain’t So (Myth-Busting)
Pulling on your horse’s mouth will make him hard-mouthed.
Not necessarily. It depends on when and how you pull and, even more importantly, when you release.
A horse must learn to “take a pull” in order to be trained. It won’t make his mouth hard if you do it correctly?that is, you pull at the correct time (without jerking), and you release the instant he responds.
I don’t think a horse can become soft without having been pulled on (the correct way) to some extent. Always remember, though: It’s not the pulling that educates your horse; it’s the properly timed release.
Low hands = low head.
No?your hands and forearms should always be part of a straight line that runs from your elbows to the bit. Pulling down on your reins?thus breaking that straight line?just gives your horse better leverage with which to stick his head up and brace against you.
If you keep your hands slightly above the swells of your saddle, you’ll be able to effectively influence your horse and maintain control. I can’t think of any time when it would be advantageous to pull down below your thighs.
Troubleshooting
Here are some common problems you could encounter when getting your horse to give his face, and how to fix them:
- Overbridling (chin to chest). Fix by using more leg and less rein, being sure to release when your horse softens. Also, if need be use distinct tugs to make it uncomfortable when he puts his head beyond the vertical or too low, returning to soft hands as soon as he corrects his positioning.
- Underbridling (not flexing enough?neck may be raised and braced against your hands). Fix by bumping incrementally harder with your legs at or behind the cinch while holding with your hands as assertively as need be until there is the slightest indication of giving, then release immediately, then repeat.
- Never fully softening the jaw (you’ll feel him still pulling on you even though he’s dropped his head). Fix by tugging the reins off the beat of his motion, alternating rein pressure if need be. Be sure not to tug predictably, or he may simply learn to move his head from side to side without truly giving/softening. Also, make sure the slack is out of the reins before you tug, so you’re not jerking.
- Wiggling (his rear end drifts off to one side or the other instead of driving up underneath his body). Fix by riding assertively, bumping simultaneously with both legs at the cinch. Push him up into the “wall” of your hands to straighten him out.
Sandy Collier is the author of the step-by-step training guide Reining Essentials: How to Excel In Western’s Hottest Sport, from which this article was adapted. An American Quarter Horse Association World Show champion (in junior working cow horse), the Buellton, California, trainer is also the only woman ever to have won the open division of the National Reined Cow Horse Association Snaffle Bit Futurity. For more of her “training secrets for a better- broke horse,” refer to the book, available at Horsebooksetc.com; for more on Sandy, go to sandycollier.com.