If you want to earn credit on your trail pattern’s scorecard, think beyond the obstacles. Carefully control your horse not just on the obstacles, but in between them to increase your degree of difficulty while setting yourself up for success at each maneuver. Your ultimate goal is to create a pretty picture from the time you walk into the arena to the completion of your pattern—this means you can’t forget those strides between each obstacle.
When you approach the obstacle correctly, it creates smoother patterns and requires less practice to nail it at every show, weekend after weekend. You’ll have to put in the work at the beginning to master your approaches, but once you build confidence and trust how your horse feels in a correct approach, you can rest knowing that practicing three or four times is enough and you’ll both be ready.
Here I’ll cover why the approach can make or break your pattern, discuss the tools needed for a solid approach, and cover a few obstacles’ approach in detail.
Why Guide?
Guiding a horse between the obstacles allows for a couple of things. First, you can decide if you want to choose a more difficult approach or a simpler one, depending on your horse’s skill set. Second, it allows you to set a rhythm and a cadence that’ll carry on through the obstacle. Steady cadence throughout a pattern creates a feel of continuity and flow.
Collecting the Tools
To master control of your trail pattern, you’ll use skills also essential to compete in horsemanship. These include preparation on foot, body position, rhythm (connection with your horse), and planning so you can ace the approach.
Preparation
Just like in horsemanship, walking your trail pattern on foot is a crucial part of nailing your approach to the obstacles. Walk with cadence and uidity—don’t start and stop at each maneuver. If you have to walk the pattern with other people, wait until you can walk the obstacle all the way through without stopping. You want to know where you need to approach the obstacle, and where you need to guide your horse within the obstacle.
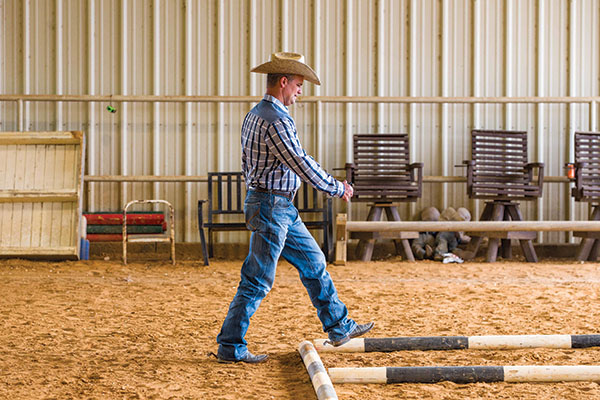
Get comfortable walking a 3-foot stride on foot, and memorize what that feels like. For a typical Western stock horse, one trot stride covers 3 feet, and one lope stride covers 6 feet. If you have two poles placed 6 feet apart, make sure you can get two of your steps between the poles. If it’s a pinwheel, you’ll typically want your horse to lope three strides, so count out six steps between the poles. Count when you walk: one, two; one, two, three; or one, two, three, four, de- pending on how many strides you want within the poles.
Body Position
Sit square in the saddle. If you’re off center or leaning, your horse’s natural reaction is to scramble to get underneath you. Your off-center position will interfere with your horse’s ability to complete an obstacle correctly.
Ride “through your stirrups” to help your horse “lift” over the poles. Don’t sit heavier on your seat when maneuvering obstacles. Instead, put your weight in your feet to free up your horse’s body. It helps achieve a higher score when you and your horse meet that obstacle together and rise up to cover it in sync.
Rhythm
Push your horse to the obstacle to better control his rhythm. When you get to the obstacle, your horse will have a better balance throughout his body. At that point, ease up on your drive and allow your horse to pick his legs up to get over the pole or obstacle. If you keep pushing the horse through the obstacle, it’ll encourage too much speed.
Use your feet to effectively control your horse’s rhythm at the trot. Press on his sides to push him to your chosen entry spot. At the lope, connect to your horse with your outside leg in rhythm with his stride toward the beginning of the maneuver.
Mastering transitions will help you gain control over your horse’s rhythm—his stride length and cadence. Practice going from walk to lope, jog to lope, lope to jog, and jog to walk. Seek a consistent rhythm of your horse’s legs in each transition.
Planning
The approach is different for each obstacle or maneuver. If your obstacle is straight ahead of you, it’s not as difficult to determine where you want to enter it. But if you have to make a turn before or on the obstacle, you must allow enough room for your horse to make that turn. When possible, cross the pole straight instead of at an angle, which can lead to knocking the pole.
Once you get to the pole or obstacle, with your horse balanced and traveling with rhythm, it’s time for your horse to show his athletic ability. You did your job of planning to position him to enter the obstacle; it’s his job to get over the pole. Get out of the way, and let him do his job.
Try It Yourself
Here are three pole-based obstacles commonly used in trail courses. I’ll describe each obstacle, present its ideal approach, and offer tips for success to be sure you maximize your score at each obstacle.
Pinwheel
About the obstacle: A typical pinwheel has at least three poles spaced evenly, with one end of each pole closer together at the center of the obstacle. The horse crosses the poles making a circle over them at a trot or lope.
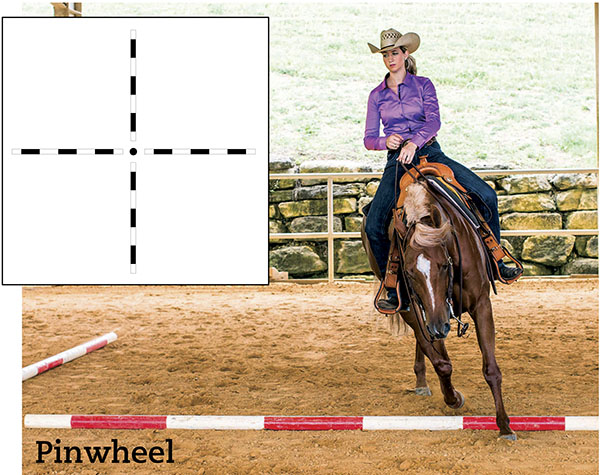
The ideal approach: If there are four poles, you’ll want to be at the ¾ spot on the first pole, which is located between the center of the pole and the end of the pole away from the center. This allows you to circle the poles at the same spot around the obstacle with an even cadence and length of stride.
Tip for success: Avoid crossing the pole at its middle or closer to the center of the pinwheel. Your horse will struggle to get in the proper strides between each pole. If you get off position, it’ll be difficult to get back to the correct number of strides between poles, which can increase your chances of splitting a pole or ticking one—both incur penalties.
Serpentine
About the obstacle: The serpentine consists of a line of end-to-end poles separated by cones or plants. You’ll weave your horse in and out of the line, crossing over the poles at several points. The serpentine is typically covered at a trot.
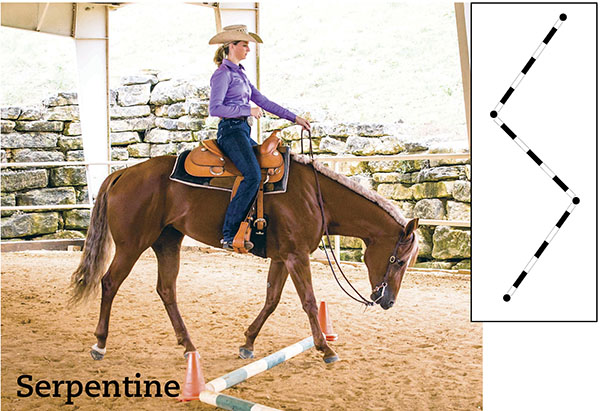
The ideal approach: This obstacle is different with every pattern. If you have room to swing out and make the turn so you can come across the pole straight, that’s the easiest approach. Try to meet the pole in the middle of it throughout the serpentine, with as little cadence change as possible. If you are approaching on a curve, look to have your horse’s front foot on the side closest to the pole cross it first. So if you’re crossing the pole from the left side of the obstacle to the right, you want that right front leg to step over first.
Tip for success: There’s not really a bad approach, but you can make it harder on yourself by not approaching the pole head-on. Keep your approach straight to keep your cadence strong.
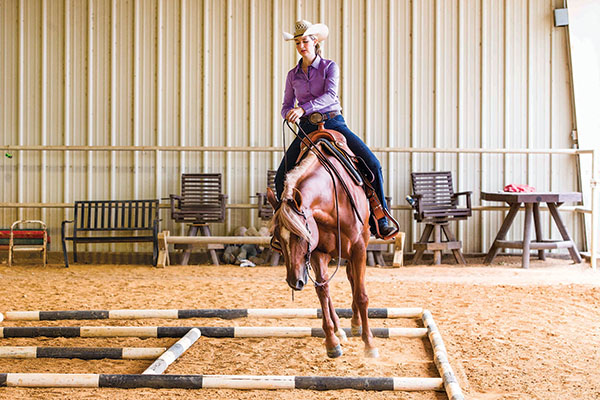
Multiple-Box Grid
About the obstacle: Most grids are set with a series of interlocking rectangles and squares spaced 6-feet-by-12-feet or 6-feet-by-6-feet. You’ll trot or lope through the pattern and sometimes do a 360-degree turn in one of the squares, depending on the pattern’s instructions.
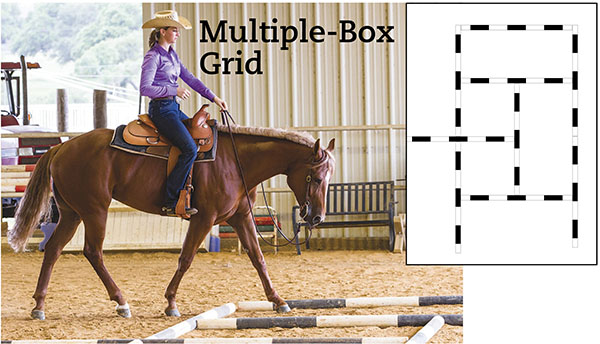
The ideal approach: The approach varies with each obstacle. Start by walking the obstacle on foot, without your horse, and pick your way through to find which foot would be best for your horse to start the maneuver. Count out your own strides to help you plan for your horse’s strides. In general, aim your horse’s inside foot—the one on the side going into a turn—to cross the pole first. But if you have one pole to cross and the next one is before a sharp turn, crossing with the other front foot first might put you in a better position at the next pole.
Tip for success: Stay close to the outside edge of the poles in the obstacle as you approach to give your horse more room to keep proper rhythm. Walking the obstacle on foot will help you know how many steps your horse needs to take between poles.
Brad Jewett, Boerne, Texas, is an AQHA Professional Horseman and has been training horses for 24 years. He started in reining and began training all-around horses 16 years ago. He’s guided riders to many accomplishments, including the 2010 and 2011 AQHYA horsemanship world championships, as well as multiple world and reserve world champions in other events and multiple All American Quarter Horse Congress champions. Learn more at jewettperformancehorses.com.


