Backing through a narrow pathway with the added difficulty of a 90-degree turn, like this L-shaped obstacle, puts your horse’s handle to the test, no matter if he’s a show or recreational mount. Practicing this exercise will point out holes in your training—especially if your horse doesn’t respond well to backing cues or move away from leg pressure.
For this exercise, you’ll need four 8-foot poles or yard timbers. Place them in an L shape, with the parallel poles 3 feet apart. If you find that this distance is too narrow to start, then begin with wider spacing to accommodate your horse’s learning curve. Bring the poles closer together as his handle improves.
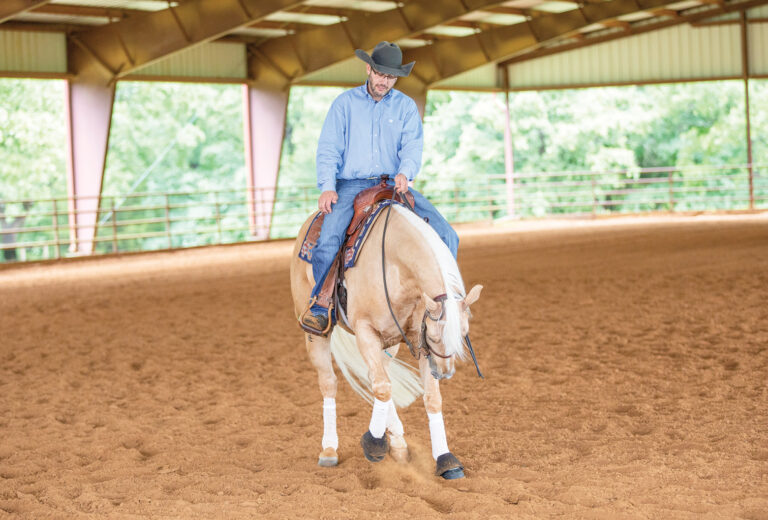
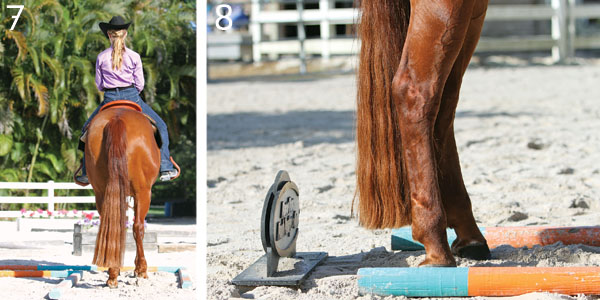
This rider is using a shanked bit and riding one-handed. You should use a bit your horse responds to, and you can start out riding two-handed, if necessary. Spurs—used conscientiously—might be helpful to get the proper response to your leg pressure.
1. Set your horse up in between the parallel poles, with 1 foot on each side of your horse’s feet. Look down to one side to ensure that he’s centered. You should be able to tell if he’s too close or too far from that pole and move his feet accordingly. Tip: If your horse tends to swing his hips to the left, for example, look at your placement on your left side. You’ll put more weight in your left hip when you look that way, which can block your horse from swinging his hind end to the left. But don’t look back and forth. Your horse can interpret that movement as a cue to move. You want him to stand quietly at the start of the obstacle, not dance around. If he’s set between the poles, pause for a moment and take a deep breath.
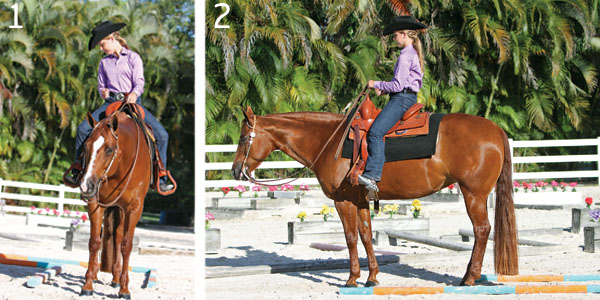
2. The ideal back-up in this obstacle is similar to the moonwalk—smooth and effortless-looking. Your cues must be subtle, both for eye appeal and to keep your horse from overreacting and jumping out of the L. Pick up your rein hand, and slightly roll your pelvis back—think of slouching just a little while pulling your belly button back toward your spine and keeping your shoulders square. At the same time, put weight in your feet and move them slightly forward. Keep equal weight in your seat and your feet to keep your horse’s path straight as he begins to back. When you want him to stop, whether it’s because you’re finished backing or you need to make a correction, relax your legs and return to sitting tall in the saddle.
3. As you’re backing, imagine that the poles extend far out in front of you, so you can see them straight out ahead as well as in your peripheral vision. This will help you stay straight in the saddle. If you do need to make a slight correction, use slight calf pressure to move your horse’s body. Some horses require constant support on one side. This obstacle will help you understand your horse’s tendencies and needs so you can accommodate them and successfully complete the L.
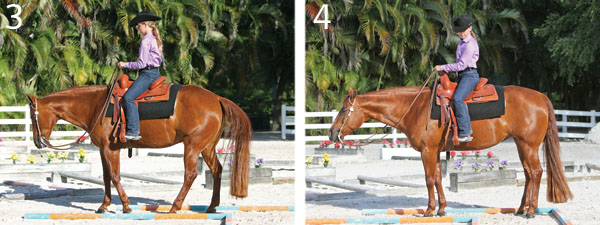
4. The ideal place for your horse to stop in this first leg of the L is when his hind feet are centered in the second part of the L. You can tell you’re in place when your seat lines up with the inside corner of the L. Note: This horse looks like he’s probably one step past that point. Now is a good time to pause and take a deep breath before you begin your turn.
5. You’ll use slow, easy leg cues to move your horse’s hindquarters through the corner first. Bring your right leg 6 inches away from your horse and back 6 inches (to go along with the left movement in this photo). Just touch your horse with your spur or heel slowly. As soon as you feel him move away from the pressure, release it and take a short pause. Taking single steps at a time will keep your horse under control and prevent rushing. This could take several tries—your horse will probably want to take more than one step at a time, often because you won’t release the pressure quickly enough. Maintain patience throughout this maneuver, and you’ll benefit from a shorter teaching period than if you lose your cool.
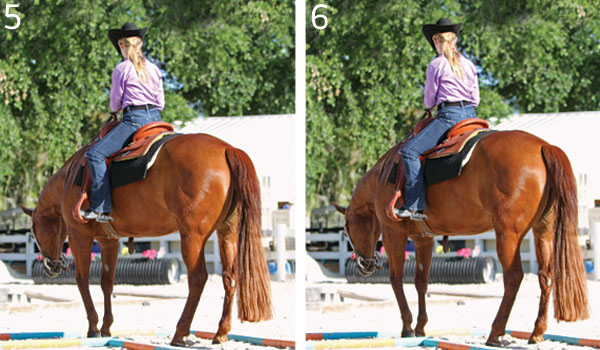
6. Once your horse’s hind feet are centered in the second leg of the L, pick up your reins and push your horse’s forehand around to the right. Use a slight press-and-release cue to get one step at a time. Don’t rush here—you want to set yourself up for an optimal finish through the chute. Once your horse is straight between the poles of the second leg of the L, stop and take a deep breath. Return to your starting position from Photo 1, with your seat deep in the saddle and your weight in your feet to encourage your horse back.
7. Remember your horse’s needs, just as you did in the first leg of the L. If he needs more support on one side (the left side in this photo), give it to him. Visualize the poles extending out in front of you to keep yourself straight and centered. This’ll help you keep your horse on the right track.
8. Be aware if there’s an obstacle at the end of the back-through. Leave enough space that your horse’s tail doesn’t catch in it—or worse yet, that his feet get tangled or he hits it. Stay aware until your very last step. Then pause, take a deep breath, and go onto your next obstacle.
Mark Stevens trains all-around horses and coaches youth and amateur riders for AQHA competition from his facility just west of Fort Lauderdale, Florida. From beginner riders to world champions, Stevens’ goal is the same: To communicate humanely and individually with horsemen and equine partners. Learn more about Stevens’ program at markstevenshorses.com.