Challenge: To nail the placement of your lead changes, especially the line changes, which come late in this pattern-when your horse may start to fall apart.
Strategy: American Quarter Horse Association Pattern II differs from I and III, in that it only has seven lead changes, not eight. Some riders view the circles at the end of the pattern as difficult, but if you’re savvy, they can provide an opportunity to correct your pace and to set up for your next maneuver. Use them to your advantage!
The pattern begins with a businesslike walk past the first marker on your right, then a smooth, right-hand turn. As you round that first corner, choose and commit to a straight path to the log’s center. As you bisect the plane of the right-hand line markers, pick up the jog.
Monitor your horse’s speed as you approach, cross and depart the log. Does he tend to want to rush this maneuver or want to slow to a walk? Practice log-crossing at home to learn his tendencies, so you’re prepared in the show pen. A hoof whacking the log will earn a one-point penalty, and even a light ticking will earn you a half-point penalty, so maintain a steady yet lively pace that encourages him to lift his feet.
Pick up a left-lead lope exactly between the first two markers of the left-hand marker line, and execute a half circle to the left around the marker. Allow plenty of space between you and the marker, preventing your horse from dropping his shoulder and diving in by guiding him symmetrically around it.
As you straighten your horse to prepare for the first left-to-right crossing change, be aware of your position relative to the pattern’s center. Use the log’s position as a guide. Know how your horse responds to your lead change cues, and ask enough in advance so that he changes in that two-stride zone in the pattern’s center.
This pattern asks for two more crossing changes, one right-to-left, and another left-to-right. In addition to a steady pace and a relaxed, focused horse, I expect the same precise timing for these two changes as I did for the first, always centered and using the log as your guide. Avoid the one-point penalty allotted to early and late changes by knowing your position throughout the pattern!
Judge’s tip: During your crossing changes, try to stay slightly to the pattern’s “high side,” which will allow you more room to circle the markers, and will afford you much-needed space upon beginning the pattern’s bottom circle. If you get too “deep” by taking a low line, your circle will suffer.
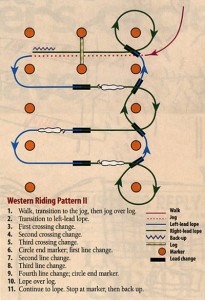
You can use the bottom circle as a tool to gain balance and control. I won’t penalize an imperfect circle. In fact, I’m looking for the rider who sets up her horse best in this maneuver. Consider using the arena railing as an aid in slowing a strong or quick horse. Take a flatter, straighter line on the left side of this circle to prepare for your line changes.
Perform your first line change with your horse’s nose pointing more to the top of the pattern rather than into the top of the corner. Don’t make a curvy serpentine pattern; ride a straighter, more direct line through the markers. Some horses get quick here-I don’t want to see you begin this pattern with a loosely draped rein, then establish a death-grip throughout the pattern. Maintain your pace without hanging on your horse’s mouth.
Line-change timing is critical. The “window of opportunity” is small, and these maneuvers occur so quickly that any errors you make are difficult to correct. Stay sharp, but relaxed. Green horses aren’t alone in committing errors, here. Seasoned horses-perhaps a tad eager or sour-can anticipate changes and incur penalties as well.
Judge’s tip: If the footing is well-groomed, analyze the location of hoofprints from previous competitors crossing the show pen. The prints usually indicate the spot you want to execute your lead changes, centered between the markers.
Your final top circle provides another chance to gain balance and control. Again, rather than making it perfectly round, use it to your advantage. As you finish the circle, select a straight line to the log, maintain your pace and cadence as you lope across it, and proceed to the left-hand marker line. There, ask for a crisp, balanced halt, then back up. You may choose the number of backing steps you take, but make it clear to me that it was your choice, not your horse’s. Stand motionless for two to three seconds, then exit the pen.
Leslie Lange knows Western Riding inside and out. With an AQHA judge’s card since 1992, she’s presided at the AQHA World Show, the All-American Quarter Horse Congress, and at the European and Australian National Championships. As a trainer/exhibitor, she’s guided multiple horses to Western Riding titles. Leslie operates her T&L Quarter Horses, LLC, in Greeley, Colorado.