
This article is part of our Guide to Grooming Awareness Campaign, brought to you by ShowSheen.
It’s not a secret that regular grooming can keep your horse looking his best and provide time for you both to bond. However, regular grooming also gives you the chance to look him over, check for irregularities, and get a baseline for your horse. In this article, we’re coming at you with a grooming routine that covers all the basics, and some extra steps to take to get a clear picture of your horse’s health.
Here is a basic grooming routine that allows you to clean your horse up, keep his coat healthy, and bond during the process.
Curry Off That Mud
Using a rubber currycomb is great way to start the grooming process. Using gently, circle motions, start at his neck and work your way back. This will loosen up dirt and mud, help remove shedding hair, and stimulate blood flow. It also acts like a mini-massage, and you might find your equine friend leaning into the currycomb when you hit itchy areas that feel oh-so-good. Be careful with sensitive areas like legs and faces, when using a currycomb. Use gentle motions to remove mud here, or opt for a stiffer bristle brush for these areas.

Bristle Brush Time
Using a bristle brush is a great way to get your horse shined up, after removing dirt and mud. Brush in short, sweeping motions from front to back, and don’t be afraid to apply a little bit of pressure with a soft bristle brush. This can help remove deep residue and add that shine to his coat. If you watch a professional groom ready a horse before a show, you’ll see that they don’t stop moving. Brush efficiently, use some elbow grease, and get every inch!
Don’t skip the cinch area! Be sure to brush under his belly, and where the cinch will sit. Missing dirt, mud, or caked on debris here can prove to be an irritant if you cinch him up over that matter. Be sure to brush the hair towards his rear, or in its natural pattern. Hair that is matted under a cinch can pinch and tug, and cause discomfort.
Face and Legs
Use a softer brush to brush his face and legs, as these areas can be sensitive. Remove dirt, hay, and dust from his face, being cautious that you don’t brush debris into his eye. You can also opt for a soft cloth to clean around his eyes and face.
Use this chance to run your hands down his leg, checking for lumps and bumps that are out of the ordinary. Brush off the mud and dirt from his legs, especially before putting on boots or polo wraps.
A Deeper Dive
Taking time to do a thorough, and in-depth grooming session often, can save you headache down the road. Dedicate time where you can go beyond the regular grooming that you do pre-ride, to take a closer look at your horse and his environment. This way, you can learn his baseline health, and quickly note any new issues that arise.
Try to add in these tasks to your grooming routine, to stay up to speed on your horse’s health.
A Finger on the Pulse
Taking your horse’s digital pulse is probably something that most of us don’t do before every ride. However, knowing how to do this, and checking it at variable times can alert you if his baseline is off. Here is a brief explanation of how to check his digital pulse, from one of our trust veterinarian contributors, Dr. Crabbe.
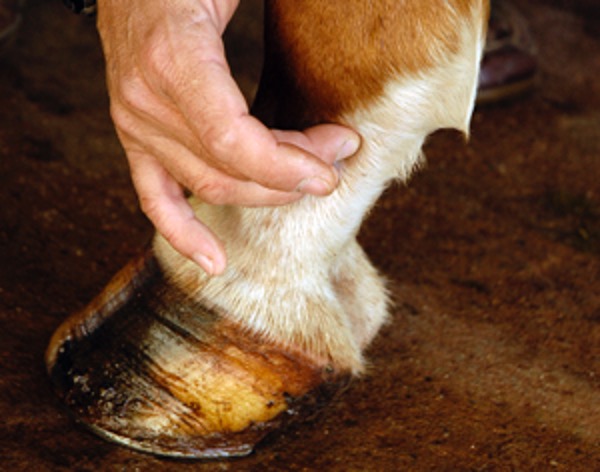
Step 1: Squat down on the side of your horse’s left front leg, and place your index finger around the left side of the fetlock joint at its lower edge.
Step 2: Apply pressure with your finger, and strum (run your finger from side to side, as though strumming a guitar) around the fetlock joint, until you feel a cordlike bundle (consisting of vein, artery, and nerve) “snap” underneath your touch.
Step 3: Apply pressure to this bundle for 5 to 10 seconds until you feel a pulse. (Note: If you can’t find a pulse, adjust the amount of pressure you’re placing on the bundle. If you press too hard, you’ll cut off blood flow-therefore the pulse. If you press too softly, you won’t create enough resistance to feel the pulse at all. Don’t get frustrated-practice!)
Step 4: Now here’s the tricky part. You need to determine whether your horse’s digital pulse is throbbing abnormally. It helps to know what a healthy pulse feels like-but you can’t always find a pulse on a healthy leg/hoof. It might be too faint. On the other hand, you’ll know he has a problem if you can easily find his digital pulse. (If you’re not sure, consult your veterinarian or knowledgeable friend.)
Step 5: Repeat Steps 1 through 4 on your horse’s other three legs.
Learn About Respiratory Rate
A raised respiratory rate can point to fever, pain (as from colic), shock, heat exhaustion, or difficulty breathing because of an abnormality in the lungs or airways. Nervousness and exercise will also speed breathing. A below-normal rate could indicate shock, hypothermia, the effect of a drug, or simply good athletic condition.
How to check: Count the number of breaths taken in a 30-second period by observing the rise and fall of your horse’s chest or the flaring of his nostrils. Multiply by two to determine the breaths per minute.
A normal range is 10 to 18 breaths per minute.
Practice Palpating His Back
During this thorough grooming session, take a few minutes to palpate his back for soreness. Checking your horse’s back for soreness is a quick practice that you can actually work into every grooming session, pre- and post-ride.
When you groom and tack up your horse, run your hands across his back and over all four legs. Run your hands along either side of his spine, looking for reactions, flinching, or pressure points. Know what’s normal, notice areas of increased heat or swelling, and pay attention if he seems sensitive or show signs of pain. If you do find something not quite right, don’t ignore it. Often, if he is particularly sore in an area, he might even flinch away from the pressure of the brush. Take note of any changes before and after a ride.
Clean Those Feet
Picking out his hooves before riding is an important part of the grooming process. Removing rocks and build-up can keep him comfortable and prevent future issues. And this is a great time to check his overall hoof health, as well.
Be studious of your horse’s feet. While you’re cleaning hooves, be alert of any new and strange smells, that can signal issues like thrush. Note if your horse reacts to any part of the hoof cleaning, like if you strike a specific spot and he pulls his foot away. Look carefully for cracks, or soft areas that might prove to be an issue.