Whether you’re on your horse’s back or dismounted to clear a path, check a hoof, grab lunch, or help a trail buddy, it’s important that your horse knows he must follow your directions. If you ask him to stand still, he should stay put without continuous prompting. To accomplish this goal, teach your horse to ground-tie (stand still, even when you walk away).
[READ: Julie Goodnight’s ‘Eueka Moment’]
In the first of her exclusive natural-horsemanship series, top clinician/trainer Julie Goodnight helps you understand what it takes to be your horse’s leader from the ground. By teaching your horse to stand still, you’ll help him focus on you and establish yourself as his leader, fulfilling his natural instinct to follow a dominant personality in a herd. You’ll teach your horse that you’re the trusted leader in your herd of two.
Before mounting up for a long adventure, make sure your horse listens to you when you’re on the ground, says Goodnight. At no point should he make his own decisions about what to watch or where to go. You’re in charge of his every step; or, in the case of ground-tying, his every stance.
Ground-tying is a wonderful skill for any horse to have, notes Goodnight. Not only is it convenient when you need to step away from your horse to perform a task, but it’s a sure sign that your horse is obedient, focused on you, and trusts your authority and leadership. This kind of rewarding relationship with your horse can only be achieved by investing time in ground-work exercises at home.
Exercise Prep
Natural-horsemanship lesson: Teach your horse to stand still on command.
Why you need it on the trail: This skill comes in handy any time you need to hop off to remove fallen branches, open a tedious gate, arrange your saddlebags, help a friend, or simply stop to rest. Teaching ground-tying also boosts your confidence in your horse and his confidence that you’re in charge, no matter what spooky or interesting conditions surround him.
What you’ll do: You’ll ask your horse to stand still, vigilantly correcting him by shaking a soft training lead toward his halter any time he starts to take a step. You’ll gradually progress to laying down the rope and walking a short distance away. Finally, you’ll test his ground-tying skills by working with him in his usual tack.
What you’ll need: A rope halter; a 12- or 15-foot training lead with a knot (rather than metal) attachment; your usual bridle with split or loop reins, and your saddle. Caution: Never allow loop reins to hang down where your horse can step through them; place them over his head in a way that removes them from stepping range.
Step #1. Teach Him to Stand Still.
Outfit your horse in the rope halter and lead. The long lead will allow you to move farther from your horse as you progress in training – so that gradually your horse is less reliant on your physical presence, but will continue to stand still.
Ask your horse to stand squarely on an even surface. When he stands squarely without leaning or cocking a foot, he’ll be less likely to take a step to maintain his balance. (Any whisper of a step he takes will earn a correction from you.)
Loosely hold the training lead, and stand well in front and slightly to the side of your horse; point your toes toward his shoulder. (Don’t stand directly in front of your horse, where you’d be in his path if he moved forward quickly.)
Note: Always face your horse when you want him to stand still; he’ll learn that’s a cue. When you want him to move, you’ll face the direction in which you wish to go.
[READ: Take Control of Your Horse]
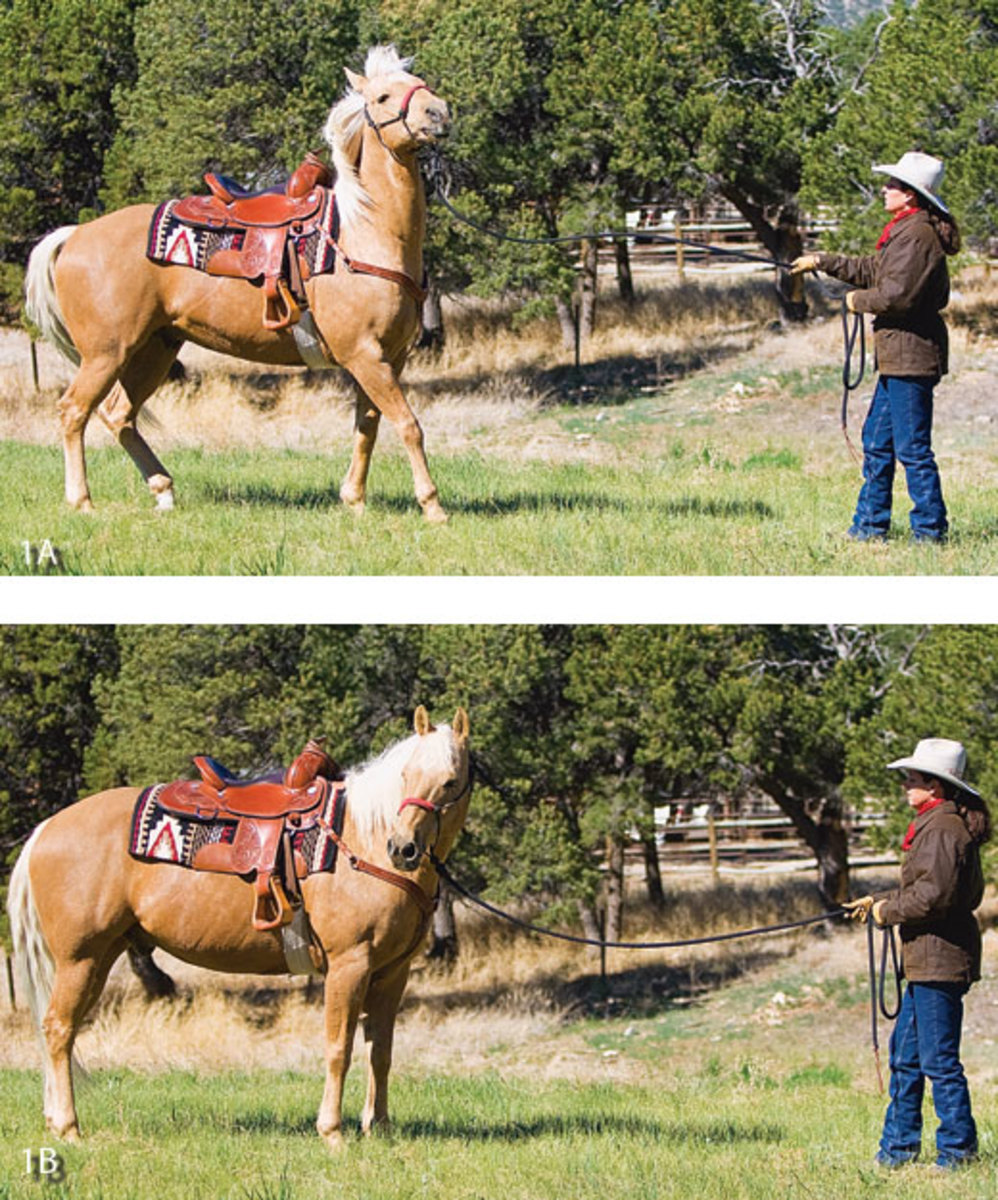
Give your horse a verbal “whoa” cue, then watch vigilantly for any movement. The instant he starts to pick up a hoof or moves his nose beyond the width of his shoulders (Photo 1A), issue a correction.
Correction technique: Flick your wrist up and down to send a wave through the lead toward your horse. (Be careful not to jerk the lead toward you, which would cue him to move.) This wave movement causes the halter-to-lead knot to bump your horse in the chin, letting him know what he was doing at the time was wrong (Photo 1B). The knot is enough of a correction; a metal attachment can hurt your horse and make him fearful of future corrections.
Important: When your horse moves, correct him immediately. He must receive a correction within three seconds of his infraction to understand your meaning. The sooner within the three-second time frame the correction occurs, the more likely he is to understand.
Continue working with your horse in this manner until he’ll stand still several minutes without a correction. Work up to 10 to 15 minutes. Practice this stage daily until your horse stands still without correction, keeping his attention focused on you, his herd leader.
Gradually stand farther and farther away from your horse, until you reach the end of the long lead. When he stands still at the end of the lead, move from side to side, one step at a time, so that he learns to stand still even when you’re moving.
Practice the standstill in locations around your barn, gradually getting farther away from his comfort zone. Find times to practice when you’re sure your horse doesn’t want to stand still, such as when the other horses are going back to the barn or leaving the arena.
Step #2. Lay Down the Lead.
Once your horse respects your leadership, it’s time to test his stick-to-itiveness. Ask him to stand squarely. Lay down the lead, and hold onto the very end. Verbally tell your horse to “whoa.” Note: Make sure the lead hangs straight down from your horse’s head, so the weight doesn’t pull his halter to the side, cueing him to move.
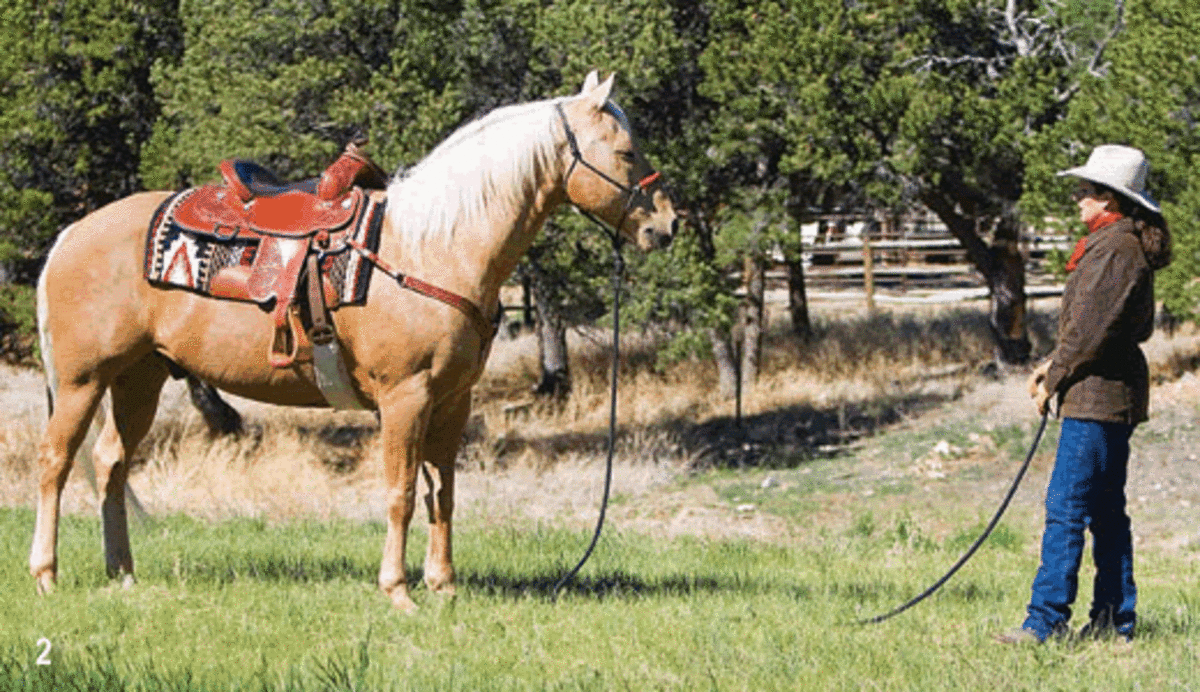
If your horse turns his head too far (Photo 2) or threatens to take a step, send a large wave through the lead to correct him. (You’ll need to exaggerate your movement to send the correction through the longer lead length.) If your correction is meaningful, he should back up a step and look concerned about getting in trouble. If he doesn’t, you haven’t used enough pressure in your correction to motivate him to change his behavior.
Practice with the lead in this position until you can step from side to side around your horse (as far as you can go without dropping the lead) without him moving, and you’re correcting him only rarely.
Step #3. Walk Away.
Now it’s time to test your horse a bit more. Position the lead so it hangs down from your horse’s halter, and lay the excess on the ground. Slowly walk a few steps away from him, and stop.
[READ: Using a Mounting Block with Julie Goodnight]
If your horse moves, issue a stern verbal correction (“whoa!”), and move immediately to the lead to correct him. (Your verbal cue will keep his attention on his infraction until you have time to pick up the lead.) Lead your horse back to his original location. Repeat this exercise until he stands still when you walk a few steps away.
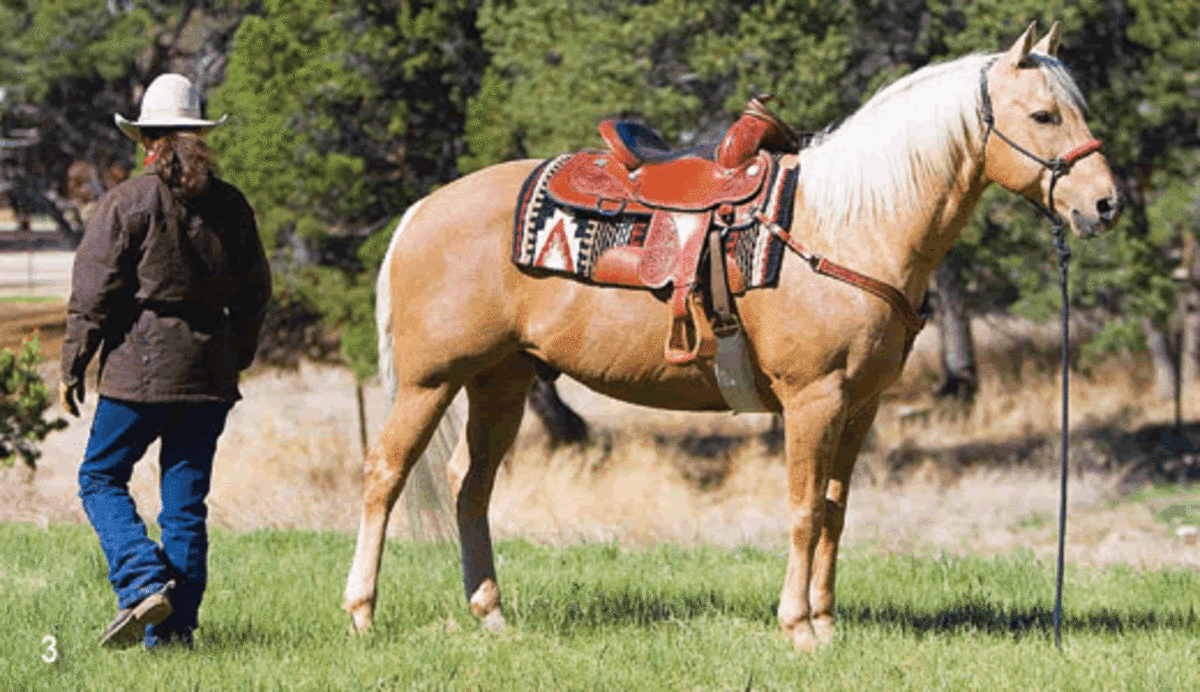
Once your horse continues to stand still when you walk a few steps away from your in-front stance, walk farther away. Gradually increase your distance until you can walk all the way around him – and walk away from him in any direction.
Note: At first, it’ll be easier for your horse if you continue to face him as you move around and away from him, but eventually, he should stand regardless of your body position (Photo 3).
Increase the time your horse will stand ground-tied by practicing this exercise when you groom him, tack him up, or even bathe him. Test him frequently; look for opportunities to ground-tie him, even if only for a minute.
Step #4. Tack Up.
When your horse consistently stands still on command, you can walk around him and away from him, and you rarely have to issue a correction, it’s time to try this exercise in your regular tack.
Outfit your horse in his usual bridle and reins. (If you use split reins, allow them to hang down, mimicking the weight and feel of the rope, but keep loop reins securely over his head to avoid entanglement.) Ask your horse to stand squarely, say “whoa,” and step away (Photo 4A).
If your horse starts to move, say “whoa” sternly, and move immediately toward him to correct his position. To correct him, don’t use the wave technique you used with the lead. Instead, gently pick up the reins, and use them to cue your horse to back up to his starting position. Then reissue the “whoa” command.
Important: Never use the reins for punishment, whether on the ground or in the saddle. Use bit pressure only for communication. If you use the reins for punishment, it may cause your horse to fear bit pressure and consequently lose trust in you as his leader.
Walk Away
When your horse is ready, it’s time for the ultimate test. Walk all the way around him while he stands in place, then walk away and out of his sight (Photo 4B). He should trust that you, his herd leader, have placed him in position and will stand still until he receives further orders. You’ll trust your horse to stay put, and he’ll trust that you’re in charge, firm, and worthy of being the herd leader.
Julie Goodnight (www.juliegoodnight.com) lives in central Colorado, home to miles of scenic trails. She trains horses and coaches horse owners to be ready for any event, on the trail or in the performance arena. She shares her easy-to-understand lessons on her weekly RFD-TV show, Horse Master, and through appearances at clinics and horse expos held throughout the United States. She’s also the international spokesperson for the Certified Horsemanship Association (www.cha-ahse.org).


