Obstacles made of ground poles play key roles in trail patterns, so pole practice is essential if you compete in the class. But work over poles can benefit any horse and rider. By setting up “objects,” as I call them, composed of poles and other components of trail obstacles, you can test your horse’s steering, hone his response to your cues, and increase your focus.
This Private Lesson was shot during an actual group lesson at my barn. While the riders do compete in trail classes, I’d have them work these objects (or obstacles) whether they showed or not for the aforementioned benefits. The riders will work through two objects that you can setup at home in an arena or in a flat, open riding space. Our poles are painted, which helps my students plan their approaches to the poles, as well as keep their horses’ interest. Horses and riders lose interest in plain poles without any striping or colors, which is detrimental in an exercise that requires repetition. Paint—whether stripes or more intricate designs—gives the poles interest and lets the riders “spot” where they need to go.
1. After a good warm-up, each rider jogs her horse over a single pole. This helps establish cadence and a solid gait early on in the riding session. She counts “one-two-one-two” with her horse’s footfalls as she approaches the pole so she can squeeze her horse with her legs when she reaches the pole to maintain cadence as they jog over it. You can see the cadence in this image with the horse’s diagonal feet hitting the ground at the same time. Good gaits with even cadence are essential for pole work because of the planning required to get through an object—or even over a single pole—without any ticks or knocks.
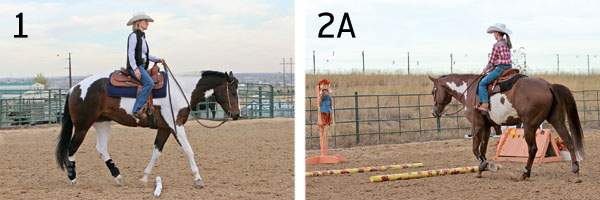
2A. Successful work over poles requires the horse to wait on the rider rather than rush over the object. The horse almost has to think “backward” instead of “forward.” For this obstacle, the two poles are placed about 3 feet apart (per the breed association rulebooks), and the second pole is 15 to 18 feet from the fence. The short spacing from the fence mentally trains the rider to be ready for the speed with which obstacles approach in a competitive pattern. The stands on the sides of the poles help the horse maintain his straight path, as do the jump standards. By traveling toward the immovable fence, the horse has to think “backward” and await the rider’s cues.
2B. As the horse exits the chute, you can see that her ears are forward and she has an expression that she might want to rush through the rest of the obstacle. The flower box and fence in front of her path help her back off that rushing mentality, which allows the rider to stay in better control. It also gives the rider something to look at and ride to, which keeps the rider from thinking she’s finished before she’s completed the obstacle.
2C. Once she’s through the standards, the rider guides her horse in a sharp turn to the left and is careful not to break gait or lose control. The sharp turn continues the goal of keeping the horse from rushing through the obstacle. The rider’s low hand guides the horse’s front end. Pressure from her left leg keeps the horse from leaning into the turn, and the rider’s right leg drives the horse forward.
3. Gait correctness and impulsion are imperative for pole work, so before the rider attempts to navigate an object, like the lope-over half wagon wheel in this drill, she must ensure that her horse is traveling correctly. Here, the rider isn’t pleased with her horse’s gait, so she circles before the obstacle to work on her horse’s correctness. This will set the pair up for success when working the obstacle.

4A. Satisfied with her horse’s gait, the rider lopes over the first pole and approaches the second pole. The three poles she’ll lope over are placed 61/2 feet apart (per breed association rules). Two exterior poles (one at the horse’s right-front foot in this photo and the other near the dragon’s tail on the jump standard) help the rider set her path over the poles. They also perform a job similar to the fence’s in the first exercise—to keep the horse thinking backward instead of rushing through the wagon wheel.
4B. As the rider makes her way over the poles, she’s careful about her horse’s placement going over each one. Her horse has a long stride, so she takes a path toward the outside of the poles for proper foot placement between each object. A shorter-strided horse needs to travel closer to the inner ends of the poles. Furthermore, the rider plans her arc over the half wagon wheel as if she’s riding over an entire wheel, which will keep her arc symmetrical and round. She uses her inside leg to keep her horse from falling into the circle and cutting off the second half of it. Her outside leg helps maintain the horse’s impulsion and cadence.
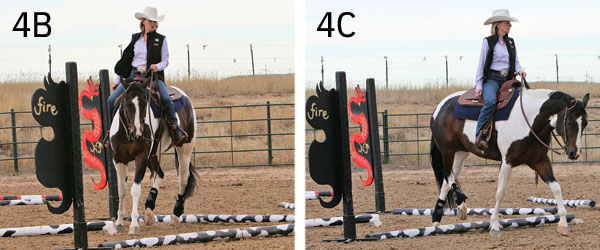
4C. When exiting the half wagon wheel, the rider continues to support her horse with her legs, looks ahead with her eyes and body, and keeps riding. So many times the biggest mistakes come at the end of an object, when the pilot quits riding. Even though she’s at the end of this drill, she doesn’t let her horse quit before they’ve cleared and moved away from the obstacle.
Karen Banister, Brighton, Colorado, is a multi-carded judge and has trained horses and coached riders to multiple world championships in both English and Western events. She owns and operates White Harvest Farms alongside her husband, Marc.