
Hobbles, which are straps or cuffs that link your horse’s two front legs together, have been used as a form of restraint since ancient times. (Hind-leg hobbles are used as well, for such purposes as breeding, but I’m going to focus on front-leg ones here.)
I use hobbles on my horses for several reasons: Hobbling reinforces the concept of restraint, it teaches patience (and how to stand still…without pawing), and it also teaches a horse not to panic should his front legs become entangled or entrapped.
Plus, just as with tying your horse out (see, Bob Avila’s Winning Insights, April 2013), when you introduce the concept, your horse will only be fighting with himself. And you get to be the good guy when you come to “rescue” him. Trust me, those good feelings do transfer to under-saddle work.
As a bonus, if you trail ride, you can hobble your horse instead of tying him up, if a safe tie spot isn’t available. (Be forewarned, though: Some horses can figure out how to run with their front legs hobbled!)
The How-to of Hobbling
If the concept of teaching your horse to hobble scares you, relax. My experience has been that as long as you follow some common-sense do’s and don’ts, it’s hard for your horse to get in a wreck. (See “Hobbling Do’s & Don’ts,” page 32.)
That’s not to say that he won’t “test” the hobbles; occasionally, I’ve even had horses drop to their knees. But, as you’ll see in the photos on these pages, most horses figure out hobbles fast, and quickly accept them as a form of restraint.
Step 1: Get the hobbles. As shown in the photo on page 30, I use soft, braided-cotton hobbles, although any soft, non-chafing material will do. Ride, round-pen, longe, or turn out your horse, to get the “fresh” out of him. It’d be unfair to introduce hobbles to a fresh horse, and could invite trouble. He’d already be combustible, and the hobbles could light the fuse.
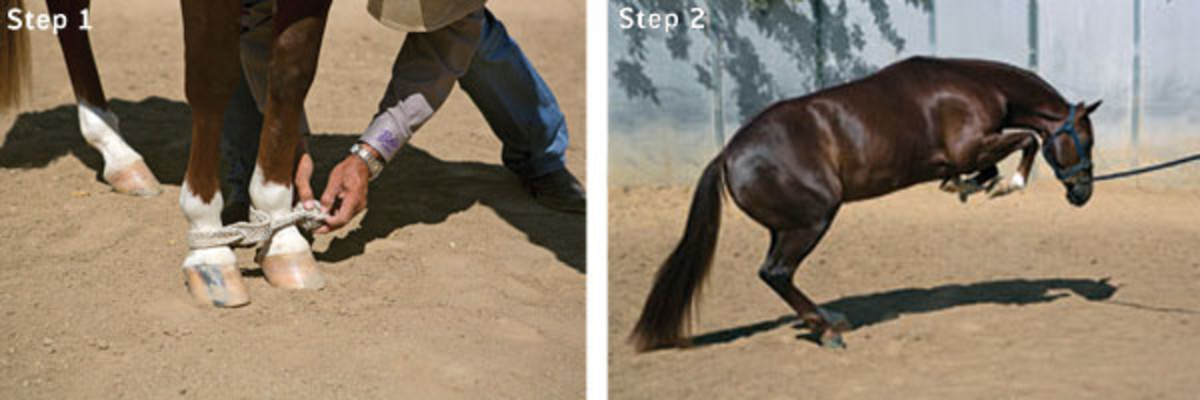
Outfit your horse in a well-fitting halter and lead rope, and head to a safely enclosed area with good footing that’s free of obstacles. I’m using a round pen in the photos here, and you’ll see this colt’s “real time” introduction to hobbles.
Stand your horse’s front feet square, with about 5 inches between them. (If you were to leave a wider spread between them, it’d take away from the hobble effect, since he could more easily move his front legs independently.) Staying safely to the side, apply the hobbles to his front legs, as shown. Then stand back, keeping a hold on the lead rope, and being careful to stay to the side (and out of his path), should he launch forward.
Step 2: If your horse doesn’t move, cluck or apply gentle pressure to the lead rope, to encourage him to take a step—but be prepared as you do so. It’s not unusual for a horse to attempt to escape the restraints by leaping away from them, as this colt is doing.
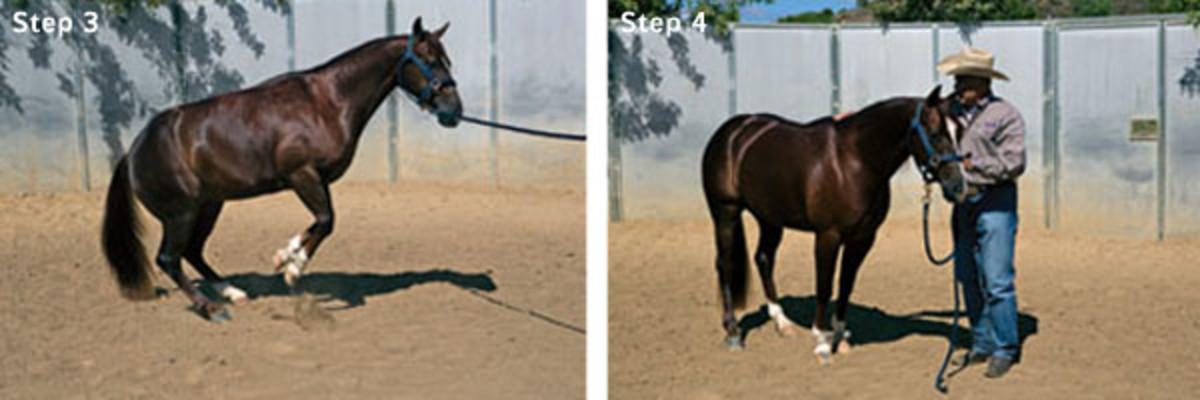
Let your horse figure it out on his own, but keep hold of the lead line, so you can help keep him from getting in trouble, and to help him balance. (Be sure to keep the slack off the ground, so he doesn’t inadvertently get his front legs over it.)
Step 3: Be patient and vigilant. I’ve rarely had a horse fight for long. On average, I’d say it takes about 10 to 15 minutes for a horse to figure out that it’s easier to stand still, than to fight the restraints. (It may take less time for a quiet-minded horse, or more time for a hot-minded one.)
Whenever your horse pauses momentarily, be sure to praise him verbally as you continue to stand back from him. Gradually, you’ll notice that his pauses will get longer, and his “outbursts” will get shorter, until they cease.
Step 4: When your horse stops reacting to the hobbles, quietly walk up to him, and rub your hands over him as a reward. Note: Be careful, and be sure to watch his ears and expression. A high head, twitchy ears, and tense expression could indicate he’s still hyper-reactive, so approach him with care. This colt’s lowered head and forward-pointing ears are a sign that he’s accepting the restraint.
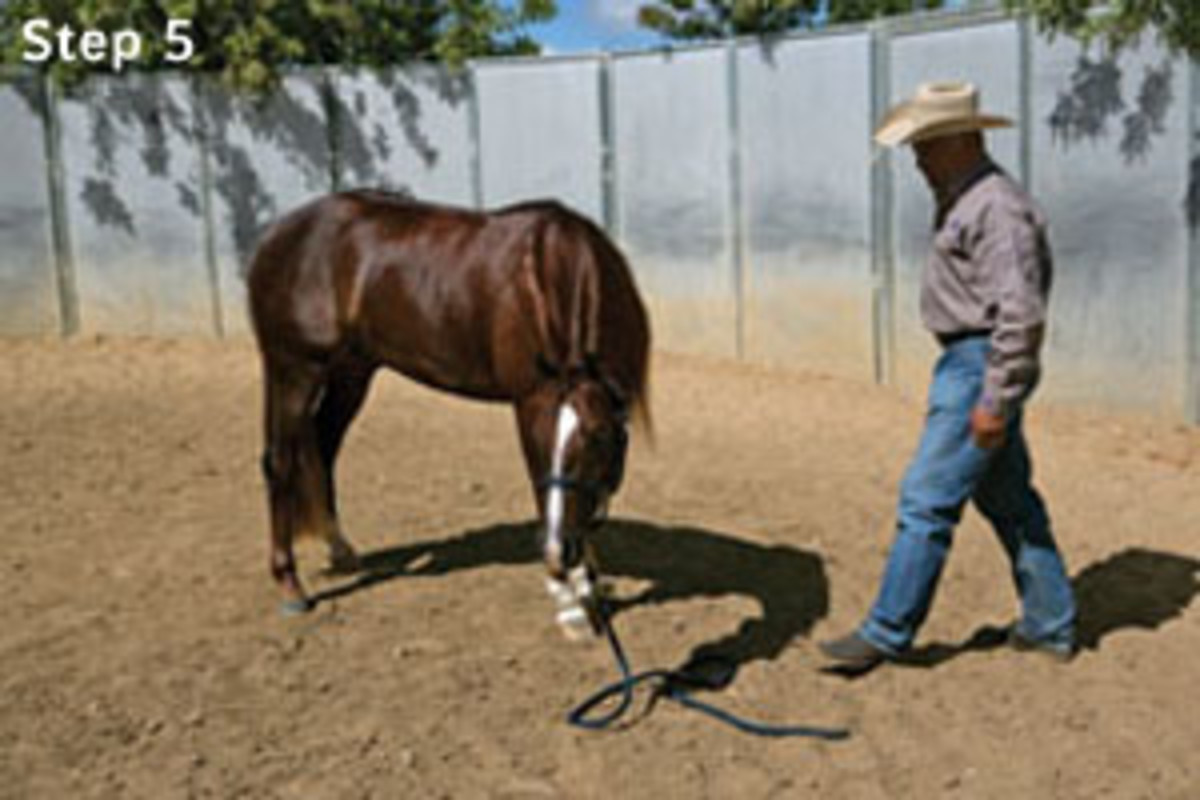
Rub him on both sides, to reassure him and let him know that he’s made the correct decision to quit fighting the hobbles. Then…
Step 5: …test his reaction, by dropping the lead rope, and walking around him. If he has a “relapse,” that’s OK. Let him work through it, then walk up and reward him again.

Allow him to stand quietly for another 15 minutes or so, then carefully remove the hobbles. Repeat Steps 1 through 5 for several consecutive days, then incorporate hobble training into your regular routine.
I’ll hobble youngsters (and oldsters), then sack them out with a saddle pad or a stick with a plastic bag attached or…use your imagination! Once a horse has accepted this form of restraint, I’ll hobble him in the arena where my staff and I are working horses. We’ll then push cattle past him, and ride by him, to desensitize him to cattle and arena traffic.
As with tying a horse out, hobbles are another tool for your training toolbox, helping you get your horse broke. The more you change things up for him, the more adaptable he’ll become, which will make life easier for him—and for you.