
You probably won’t see a horse execute a square corner when doing ranch work in a pasture, but it is an element that judges can call for in a ranch riding pattern. A defined, 90-degree angle completed by a willing, soft horse is a showy maneuver that can earn credit. I see a lot of rounded corners that are functional and correct, but lack that crisp angle required to boost your score.
Here, I’ll go over steps to practice a square corner at home. You’ll see a cone in these images—this is only for practice and to reference where the 90-degree angle is made in the photos. Ranch riding patterns don’t use cones; instead, you must lay out the pattern to best show your horse.
Nail the Square Corner
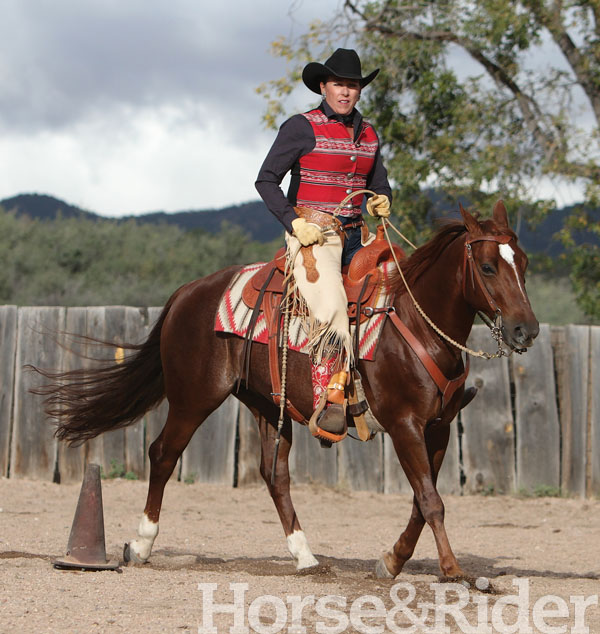
1. The rider’s position for ranch riding is more a functional one than you might see in a traditional horsemanship class. You can see here that my shoulders are square with my hips aligned beneath them; my legs are in an effective position; and my toes turn out slightly, giving me closer contact with my calves on my horse. I like to call it “riding with a purpose.” It’s efficient, natural, and functionally useful.

2. A judged ranch riding pattern doesn’t use cones, but I’ve included one in this demonstration for reference. When you practice at home, the cone can help you stay straight in your approach, as well as help you time your cues for the eventual 90-degree turn. But don’t look at the cone; you must look where you’re going.
As I approach the cone, I ride my horse forward with impulsion—he’s driving from his hindquarters, he’s looking ahead, and he’s listening to me. My eyes look up and forward, which helps my body stay square to keep my horse on a straight path. As I get closer to the cone, I’ll shorten my horse’s stride slightly, just as if I were driving a car and slowing down for a turn. But I maintain my horse’s impulsion to keep his hind end engaged. Without this impulsion, my horse could fishtail out of the corner or make too round a corner, two problems I’ll discuss later.
Make the Turn
3. To make the turn, I ride my horse just past the cone and then begin to guide him through the corner. As we start around the 90-degree angle, you can see that my horse is steering well. His nose leads his directional path, his head and neck demonstrate collection, and his hindquarters are engaged to propel him forward with impulsion. You’ll notice I don’t have a long drape in my reins; I keep contact with my horse’s mouth to facilitate his collection and propulsion and for better control. As we come around the corner, I use strong outside-leg pressure to keep his hindquarters engaged; I use less pressure from my inside leg to keep his body upright through the turn. I’m beginning to look through my turn, which slightly rotates my torso and helps guide my horse to the right.
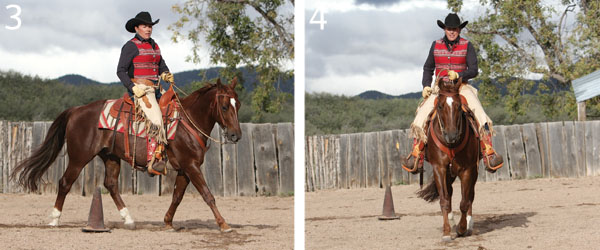
4. We’ve come through the turn, and my horse is straight from his nose to his tail. Now that we’re back on the straight line, I’ve released most of my leg pressure to keep him from veering to the left or right. My hands are relaxed, but in a working position—not too high or too low. My horse’s straightness and my body position set us up to execute whatever the pattern calls for next. If it’s another square corner, I’ll set my horse up like I did for the first one. No matter what’s next, we’re prepared for it.
Potential Mistakes
5. Here’s an example of the first mistake I mentioned: fishtailing out of the corner. This means my horse loses his hind-end propulsion, and thus his straightness as he finishes the corner. In this example, I rode my horse too deep into the turn without enough impulsion or collection, so I have to push his shoulders over to the right into the turn.
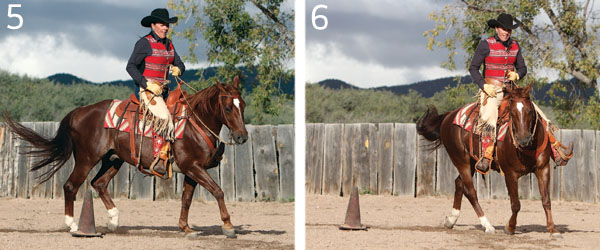
My horse is stiff and has to lean to compensate for my rigid body position. He’s resisting me and leaning to the outside of the turn. You can see a distinct difference in his stride between Photo 5 and Photo 3. This all could’ve been avoided if I’d approached the corner with collection and impulsion.
6. The roundness of this corner is brought on by too much inside-leg pressure. My hand is centered, so I’m not steering him on the rounded-corner path, but my leg is pushing him on that track. This isn’t necessarily a bad maneuver overall; it’s just not right for square corners. In a square corner, a horse’s body must be more upright. This horse is on more of an arc. He’s reaching underneath himself nicely; he’s just not completing a 90-degree turn.
My Horse’s Tack
1. Plain leather headstall with rawhide accents. This high-quality, one-ear headstall has solid buckles and plain Chicago screws to attach the bit. You can also choose a sliding-ear or two-ear headstall. If riding in a snaffle bit, use a browband headstall with a throatlatch strap to keep the headgear in place. Adjustment plays a key role. You can see here that my headstall is adjusted to place two small wrinkles in the corners of my horse’s mouth. A snaffle bit would be adjusted slightly lower.
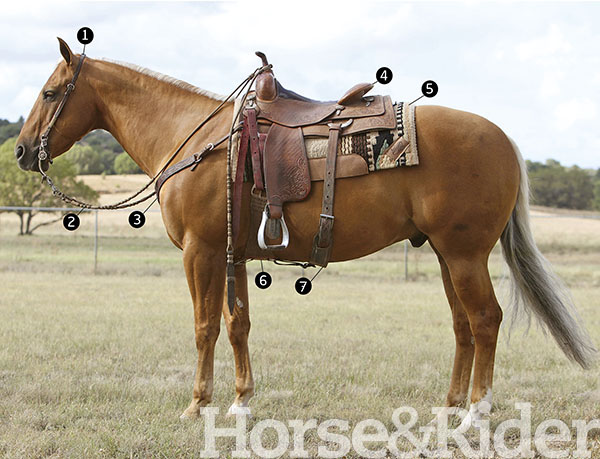
2. Braided rawhide romal reins. Growing up in the Southwest, I’m accustomed to riding with romal reins. Leather split reins are also permitted in the class. Choose whichever you prefer, but be sure you know how to correctly use romals if you opt for them.
3. Leather breastcollar. Tooled leather is permitted in the class, as seen on my breastcollar. It’s adjusted to lie across my horse’s shoulders, and the strap between his front legs is snug. A breastcollar is suggested, but not required. I prefer to see one because it paints the picture that you’re prepared for anything that’ll cross your path.
Saddles, Pads, and Cinches
4. Western saddle. Saddle-style choice lies in your own preference. This horse wears a fully tooled, double-rigged, square-skirt saddle. Silver is discouraged, but there isn’t a penalty for it. As a judge, I’ve seen it used to break ties—if you have a lot of silver, you might lose a tiebreaker.
5. Navajo-topped therapeutic saddle pad. This is another piece of tack that has some leeway. You can show in a plain pad, if that’s what you prefer. I use a therapeutic pad for my horse’s comfort. It has a Navajo-blanket top, which adds a pop of color and design interest.
6. Mohair cinch. I prefer a synthetic mohair cinch because it breathes. Neoprene or fleece-lined cinches are also acceptable. My cinch is tightened by the leather latigo with enough tension to hold my saddle in place, but not cut my horse in half by being too tight.
7. Flank cinch and hobble. My back cinch is adjusted to lie against my horse’s barrel—not hanging down below, where a hoof could get caught in it, nor snubbed too tight, causing discomfort. The hobble is tight enough that there’s no slack to catch on anything and it holds the flank cinch in the appropriate position, rather than letting it slide back too far.
[READ: Ranch Riding Transitions for the Win]
My Attire
1. Western hat. As in any show event, a clean, well-shaped hat sets the tone for the judge. Be sure your hat fits well. My hair is pulled back into a ponytail at the nape of my neck. Many lady ranch riders braid their hair down the center or to the side. Just be sure it’s neat and tidy, with no stray hairs.
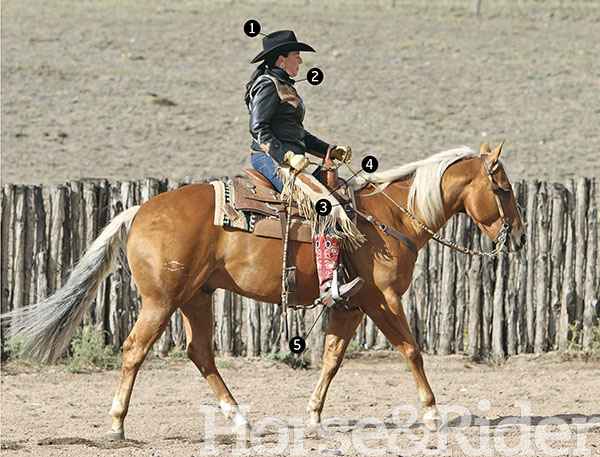
2. Neck scarf. I tie a small scarf around my neck with a square knot. You can also use a larger wild rag, or skip the scarf.
3. Leather jacket. Your top is where you can express your personal style. I prefer leather jackets or denim, leather, or fabric vests paired with Western, collared shirts. You can keep it simple with a well-fitted Western, button-up shirt. Just leave the bling at home.
4. Chinks. Chaps aren’t required for ranch riding, but I prefer to wear chinks over my dark-blue denim jeans for a complete look. Other chap options include rough-out chaps, shotgun chaps, and regular show chaps—it doesn’t make a difference, just stay away from ultrasuede because it doesn’t fit the look of the class.
5. Western boots. My chinks let me show more of my personal style, expressed in my tall-top, stitch-embellished boots. Any Western boots are acceptable in ranch riding.
[READ: 9 Tips for Show-Ring Shine]
Laurel Walker Denton, Skull Valley, Arizona, is a lifelong horsewoman and competitor. She grew up on the Bar U Bar Ranch where she and her husband, Barry, reside. Denton, an AQHA and NRCHA judge, has trained and shown horses to great success in working cow horse, reining, and ranch riding. The Bar U Bar Ranch has earned the AQHA 50-Year Breeder award. Learn more about her program at barubar.com