
No matter if you’re sliding to a stop, as I am here; aiming for a precise, square stop at a cone in a horsemanship pattern; or looking for a solid, reliable stop on the trail, it won’t happen if you can’t visualize that stop in your mind.
Solid stops seem to be the most perplexing maneuver for beginning and intermediate riders, rivaled only by lead changes. Due to your own anxieties, you might get stiff or excited, go too slow in your approach, or anticipate what’s to come—whatever the case, it results in a bad stop.
Here I’ll go over how a stop should look and feel in your mind, then cover the mechanics. Remember: I’m sliding to a stop here, but these tips apply to all types of stops.
1. To begin, study photos and videos of professionals stopping their horses to get a picture in your mind of what a good stop looks like. You can find images in magazines and videos online, and pinpoint exactly what the rider’s body does during the approach to a stop and in the maneuver itself. Keep these images in mind to help you better understand what you’re looking for. They’ll give you confidence that you know the end goal.
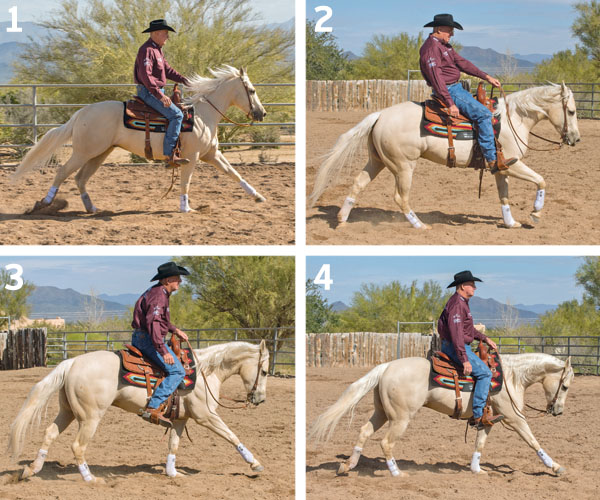
In Photo 1, I’m approaching my stop. My horse is moving freely and straight. If he waivered, went sideways, or didn’t have enough forward motion, we wouldn’t slide to a stop or precisely hit our marker in horsemanship. He has to be straight, with his body in alignment. I play a part, too, and must sit squarely and have my hand above the mane line, riding centered above my horse and slightly behind his motion to drive him forward.
2. Here, I’m too far behind my horse’s motion, which pushes my legs way out in front of me. This reclined-and-braced position means I can’t sit in the center of my horse, which will drive him off his straight path. Riding in this position, I’ve lost all feel for my horse and won’t have the timing necessary to achieve a good stop. Furthermore, my horse doesn’t have enough forward motion, or impulsion, to get his hind end underneath himself and stop solidly. Instead, he’ll likely “dribble” or bounce into his stop.
3. Here, my legs are too far back, which pushes my torso forward, over my horse, and ahead of the motion of his lope. This leaned-forward position can cause confusion when I cue for a stop, because my body is saying “go forward,” but my voice and reins are saying “stop.”
4. On my approach to a stop, I feel for my horse’s footfalls. I always ask for a stop on a down stride on his leading front foot. This gives him time to adjust his hind legs to drive into the ground for a solid stop. As I lope along, think to myself, “down, down, down” with every footfall. But I don’t say it out loud. The only verbal cues I use with my horse are clucking to go and saying “whoa” to stop.
5. Once I have the footfall count in my mind, I add in the series of stop cues, in the following correct order: Sit, drop my heels, say “whoa,” and then pick up my reins. I always cue for a stop in this order to keep my horse’s body round. My seat and legs have “melted” into the stop with my horse.
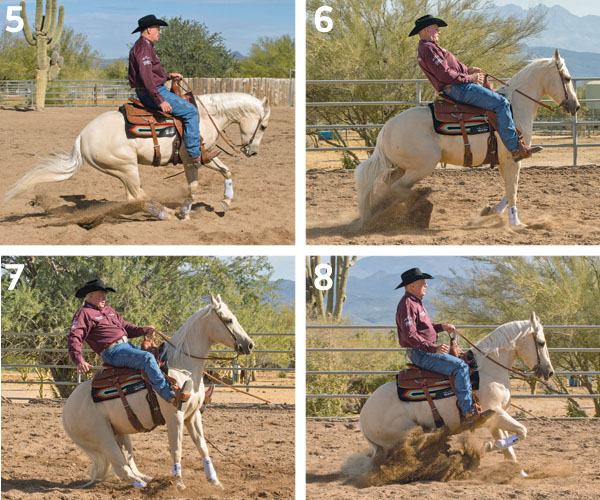
6. If I pick up my reins first to cue for a stop, my horse’s back will hollow out, the rest of his body stiffens, and he braces against the bit, as shown here. Furthermore, the other problems with my body position (leaning too far back, legs too far out in front) hinder my horse’s ability to stop correctly.
7. Remember how my seat and legs melted into the stop with my horse in Photo 4? That didn’t happen here. Stiff arms and legs hinder my horse’s ability to come to a smooth stop. Furthermore, you can see the soles of my boots here, which can be a problem, because it indicates that I’m bracing against my horse, with my legs way out in front. If you took the horse out from under me here, I’d certainly fall. If you did the same thing in Photo 5, I’d be more likely to stand, just with my knees bent. That perpendicular position is essential.
8. All of the pieces have come together here for a solid stop. My approach had enough forward motion, my horse and I both maintained our proper body positions, I cued in the order discussed in Photo 5, and my body and legs melted with the stop. Even if this horse didn’t build to a sliding stop, we’d still present a precise, correct, solid stop.
Al Dunning, Scottsdale, Arizona, has produced world champion horses and riders in multiple disciplines. He’s been a professional trainer for more than 40 years, and his expertise has led him to produce books, DVDs, and his own online mentoring program, Team AD International (teamadinternational.com).