



Simply put, ponying means leading a horse alongside the horse you’re riding. On the trail, ponying comes in handy when training a new horse. His herd instinct will likely kick in, and he’ll follow his leader through scary terrain, such as a water crossing. He’ll also see spook-inducing, wide-open country without the risk of a rider falling.
You might also pony a horse carrying supplies to camp. Ponying gives you more control over a horse a child is riding, too. It’s also useful for exercising an injured horse or a horse whose owner is injured.
In each case, you’ll need to know how to pony a horse safely on the trail. It’s a complex task. You’ll ride your own horse and pay attention to another, all while holding the reins in one hand and a lead rope in the other.
The good news? Horses don’t mind the closeness. It’s natural for them to travel at speed close to one another. Once you know how to handle the ropes, ponying can become a natural, easy way to travel.
Here, top clinician and trainer Julie Goodnight teaches you how to pony a horse on the trail safely while avoiding common pitfalls.
Before You Pony a Horse on the Trail
Exercise Prep
Before you begin, make sure your pony horse—the saddle horse you’ll ride—is comfortable with other horses close by. You should be able to control him easily with one hand on the reins. That frees your other hand to hold the ponied horse’s lead rope. He should be a safe, reliable mount that doesn’t spook.
Your pony horse should also calmly accept ropes touching his legs and tail. He should drag logs without spooking, too.
Your ponied horse should be halter broke and lead well from the ground. To be safe, both horses need good ground manners. They should also know not to interact with other horses when a human is present.
What you’ll do: You’ll learn how to handle the ponied horse’s rope and cue him to move forward. You’ll also teach him to stay in position and learn how to approach new obstacles while ponying.
What you’ll need: For the horse you’ll ride, use a bridle and a saddle with a rigid tree. (A flexible tree may put uneven pressure on your horse’s back if the ponied horse pulls.) For the horse you’ll pony, use a rope halter and a 12-foot lead rope. Wear gloves to protect your hands from rope burns if the ponied horse pulls.
WATCH THE VIDEO
Ponying a Horse with Monique Potts
Learn the importance of teaching your trail horse how to pony.
How to Pony a Horse on the Trail, Step by Step
Step 1: Learn the Ropes
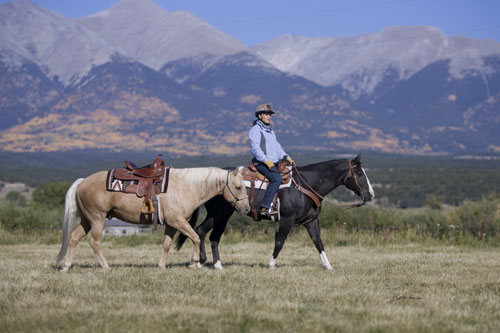
Outfit the horses in the tack listed above. Position the ponied horse on the right side of your pony horse. Hold the lead rope and reins in your left hand, move to your pony horse’s left side, and mount up. Once you’re in the saddle, keep the reins in your left hand. Then transfer the ponied horse’s lead rope to your right hand.
Note: Always hold the ponied horse’s rope so you can easily drop it if one horse slips or spooks. Never tie or knot the two horses together.
Double the lead rope so you can easily lengthen and shorten it. When it’s doubled correctly, you’ll see a loop in front of your knee as your hand rests on your leg. Never wrap the lead rope around your hand. If the ponied horse pulls or bolts, you’ll likely get hurt.
Note the doubled rope in Goodnight’s left hand. The rope nearest her pinky finger is attached to the horse and lies next to the rope’s end. The rope extending from her thumb and forefinger is doubled. She’s in position, relaxed, and ready to cue her pony horse by neck reining.
Avoid holding the rope too far behind you. With this hold and no doubled rope, there’s too much slack. Your ponied horse can fall far behind your pony horse—right in kicking position. The loose rope can also tangle in your pony horse’s legs or slip under his tail and cause a wreck.
Hold the Rope or Loop It?
Goodnight holds the rope this way whenever she’s working with a young horse. Holding the rope, instead of dallying it around the saddle horn, lets her cue her pony horse forward or back. It also ensures the horses won’t be tied together if the new pony horse spooks.
Once Goodnight knows her pony horse is obedient, she’ll often half-loop the lead rope around the saddle horn. This lets her relax her grip and hold only one piece of the rope. The rope isn’t knotted, so she can quickly release it from the horn.
Step 2: Go Forward
Ask your pony horse to walk on with your usual rein and leg aids. Add a voice command so your ponied horse hears the cue, too. As your pony horse moves forward, your ponied horse will feel the rope’s gentle pull. Because he’s halter broke, he should understand these go-forward cues.
If your ponied horse doesn’t follow, don’t try to pull him forward. You don’t have enough strength, and you could wrench your back or get pulled off your pony horse.
Instead, stop your pony horse and take a half-wrap on the saddle horn. Hold both ends of the rope in your right hand, down against your leg. Then cue your pony horse forward, and let his body weight pull your ponied horse along. It’s easy for the ponied horse to pull against you. But he won’t pull long against the pony horse’s weight.
Caveat: To pony a horse successfully on the trail, you need the skill and focus to handle two horses at once. For example, you might ask your pony horse to slow down while asking your ponied horse to come forward. Not all riders are ready for this challenge. You might forget to stop your pony horse. Or a spooky ponied horse might pull you out of the saddle. If you plan to pony a young or green horse, first practice these steps with calm, easygoing horses.
Keep the ponied horse close in at your pony horse’s hip. That way, the horses can’t step in different directions around a small tree or other trail obstacle.
Practice Your Turns
Practice walking while you maintain these lead rope and rein holds. First, walk straight ahead. Then gradually add turns to the right. Turn only to the right until you’re comfortable handling the rope and trust your ponied horse to follow. When you turn right, you turn toward your ponied horse, so the rope stays in position easily.
Turns to the left are trickier if the ponied horse isn’t keeping up. Before you turn, make sure he’s in the correct position. If he falls behind, the lead rope can droop, touch your pony horse’s tail, and even slide up under it.
If the lead rope droops, turn your pony horse back to the right so the rope doesn’t wrap around you. Drop the rope, if necessary.
Step 3: Correct Poor Positions
If your ponied horse falls behind, gather your fingers along the doubled rope to shorten the line. Then pull him forward with a bumping action. He should respect this correction, because he knows how to lead on the ground.
Don’t let your ponied horse move so far forward that he’s in front of your knee. You won’t have enough leverage to control him. He can also start to lead “the herd” instead of following your pony horse.
If your ponied horse moves too fast, pick up your rope hand and jerk it back. Point the rope where you’d like your ponied horse to be. A quick bump from the rope halter’s knot will correct him, just as it does during groundwork sessions.
Step 4: Move Out
When your ponied horse learns to follow along in formation without constant corrections, start asking both horses for gait changes. Put them to work as they transition from walk to trot.
Each time you cue your pony horse, use your voice or a bump of the rope to urge on your ponied horse. Soon, he’ll keep pace, move in step, and stay in position easily.
Julie Goodnight (www.juliegoodnight.com) lives on a ranch in the Colorado Rockies. She’s an internationally respected clinician, author, and horsemanship educator who coaches riders in every discipline and at every level. She created the TV series Horse Master with Julie Goodnight, which aired for 11 years. Today, she hosts the award-winning podcast Ride On with Julie Goodnight.