
Lesson Objective
Learn to ask your horse to yield his hindquarters by using light pressure from your hand or leg. An effective yield means that your horse crosses his inside hind leg in front of the outside hind, reaching under his body.
[READ: More With Linda Parelli]
No matter what you do with your horse—show, trail ride, run barrels—hindquarters disengagement (or yielding) is essential for two reasons. First, when a horse rears, bolts, or won’t back up, it’s because he’s over-engaged. He has a wider stance with his hind legs, which gives him a lot of power to resist you. Disengaging his hindquarters takes that power away and keeps you safe. Second, when you can move your horse’s back end as you do in this movement, you can set him up for any maneuver or position.
When teaching a horse to disengage his hindquarters, work in a snaffle bit (a non-leverage bit) or a hackamore. When you have control issues, you need direct contact with your horse’s mouth, which is provided by a snaffle bit or hackamore. Once your horse understands the cue, you can use a curb bit.
1. It’s best to begin teaching this maneuver from the ground. The handler demonstrating the steps doesn’t have to worry about balance or control issues when she works from the ground, and it makes it easier on the horse because he’s not confused by any balance or control problems the rider has. The handler begins by tipping the horse’s nose toward her with the rein and using her other hand to apply pressure where her foot will do the same once she’s in the saddle. The opposite rein is draped over the horse’s neck, within easy reach of the handler if it starts to slip.
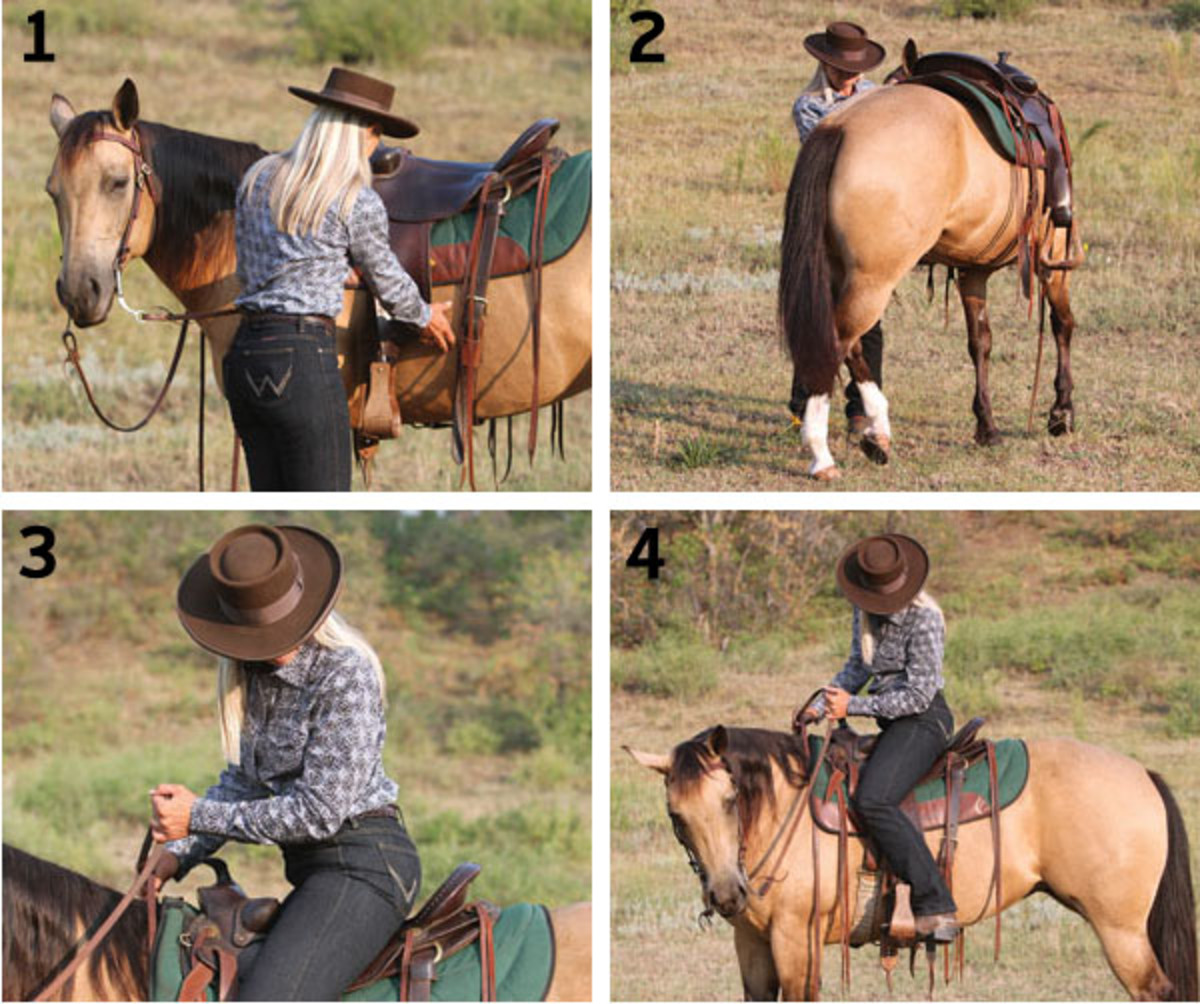
2. The horse responds to the handler’s cues by moving his hips away from the pressure. He’s disengaging his hindquarters here, as seen by his inside hind foot crossing in front of his outside hind. Work on this in both directions to make the horse accustomed to disengaging to both the left and right. Once the horse learns to appropriately respond on the ground in both directions, he’ll be prepared to recognize the cues with the rider in the saddle.
3. Once in the saddle, the rider takes an indirect rein position—she slowly brings her left rein toward her belly button, tilting her pinky finger upward, and lifts the rein slightly upward. Her other hand is resting in neutral position. This is a one-rein maneuver, so the outside rein should remain inactive, but not necessarily loose. You’ll notice that she’s looking back at her horse’s tail. That shifts her weight forward, taking it off her horse’s hindquarters and allowing him to move that part of his body.
4. The rider presses slowly and lightly with her leg and heel, slightly behind the cinch. The moment the horse responds by moving his hind end to the right, she’ll release the pressure and rub on her horse. If the horse doesn’t respond, she can increase the leg pressure or lightly tap her horse behind her leg using her hand or the end of her reins to encourage him to move. The idea is to use the lightest cues possible. Remember that a horse can feel a fly on his side, so if he doesn’t move when you press with your much-bigger-than-a-fly leg, it’s probably because he doesn’t understand what you want, not because he doesn’t feel the pressure.
5. The rider maintains pressure until the horse yields to her cues. She can’t lock her reins in place, or the horse will feel trapped and might panic. Instead, she’s elastic in her elbows. She’s patient and strives to help her horse understand what she’s asking. She won’t force him; she’ll maintain pressure with her left leg and slight lateral flexion of the horse’s nose to the left until the horse responds, which it looks like he’s about to do here.
[READ: More With Pat & Linda Parelli]
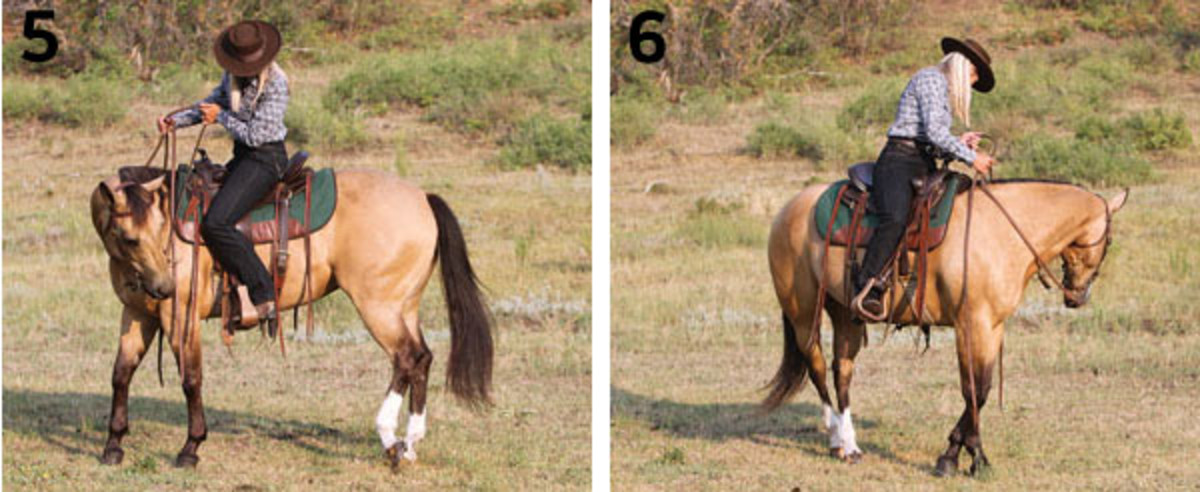
6. The horse moves away from the pressure from the rider’s leg and heel, and is about to cross his left hind in front of his right hind. The horse’s neck is flexed slightly. At first, she’ll just ask the horse for a step or two, releasing the pressure every time the horse responds correctly to the cues. With practice, the rider can ask for a complete 360-degree turn, keeping the forehand as still as possible. With some practice and refinement, this maneuver can also be performed as a turn on the forehand.
Linda Parelli and her husband, Pat, own Parelli Natural Horsemanship and present clinics and demos around the world. Learn more about their philosophy and check their schedule of presentations at parellinaturalhorsetraining.com.