I’m often asked, “How old are your horses when they transition from a snaffle to a bridle?” My answer is always the same: Age doesn’t matter.
[READ: Be Snaffle-Bit Smart]

Another question I hear a lot is, “What kind of bit do you start with when you transition from a snaffle?” The short answer: All kinds. Of course, I start with the smallest, simplest bit I can and then adjust from there. But it might take 10 different bits to find the right one for a horse, and it might be the one I never would’ve guessed.
Riders should ask about the process instead of the logistics. The foundation I put on a young horse learning to steer has little to do with what’s in his mouth and everything to do with a thoughtful process. I’ll cover those steps here, and illustrate them with photos of me riding One Time Pepto. This mare’s guide is about as honed as it can get, so her steering and softness are perfect examples to work toward.
Hand Position
The difference in my hands is pretty obvious in these photos. On the top, you see my tight grip on the reins. My clenched hands readily transmit tension through my reins to my horse, which means she’s more likely to be clenched and tight in her body. That’s contradictory to the softness and ease of steering that I’m working toward.
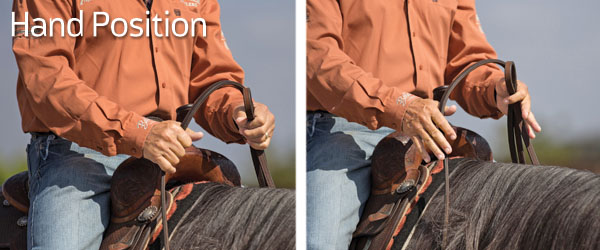
The photo on the bottom shows my open hands and soft grip. My relaxed contact will help my horse relax. If that relaxed grip isn’t natural for you, be sure to remind yourself to release your anxieties when you take hold of the reins. If you do that enough times, it’ll soon become a habit that you won’t have to think about.
In both photos, notice the distance between my hands. They’re not wide apart—my hands are close, with about 6 inches between them. From the very beginning, I train my horses with my hands as close as they can be. Keeping my hands close during the beginning direct-pull phase of training makes the transition to one-handed riding more seamless. The horse learns to neck-rein without even knowing it. Horses are creatures of habit, so teach your horse the right way to do things from the beginning to eliminate problems later in his training.
[READ: Invisible Riding Cues]
Two Hands, Snaffle Bit
I’m riding in a smooth, simple snaffle bit, with two hands on the reins. You can see how soft this mare is in her face. All horses have a different way of carrying themselves, and this mare is most comfortable packing her head lower than some other horses. She’s not intimidated—this is her natural frame, whether she’s being ridden, walking down the barn aisle, or loping freely out in the pasture.
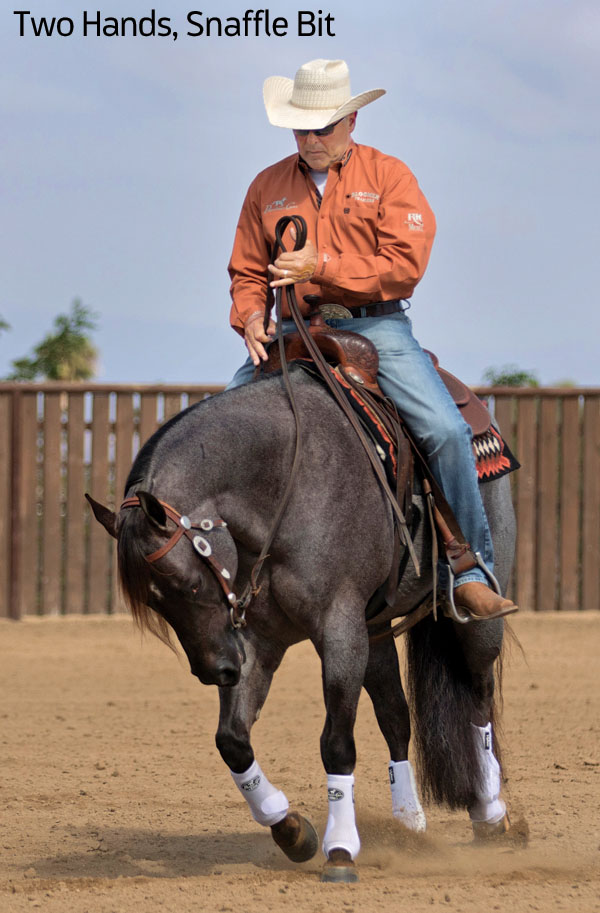
As she travels on a circle to the right, I put the indirect (left) rein on her neck while I use a direct rein to guide her to the right. This lets the horse make the connection between the indirect rein on her neck as a cue to go to the right—the initial steps toward neck-reining. Along with the neck-rein cue, I keep softness in mind, which makes any task easier, from opening a gate to changing leads.
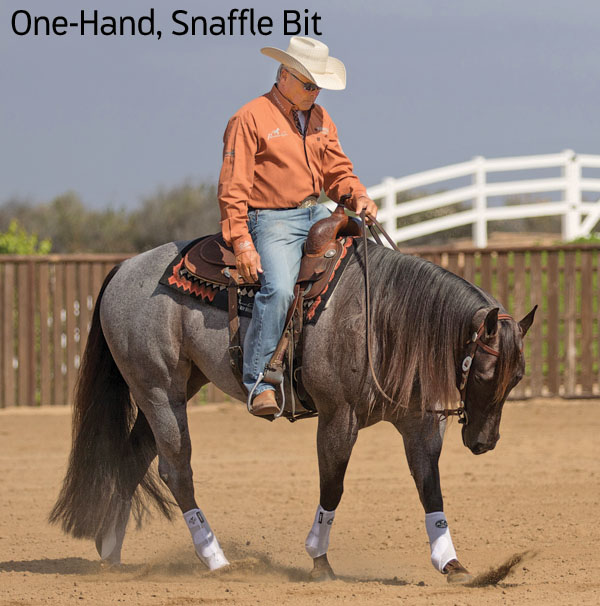
One Hand, Snaffle Bit
The next step, once my horse responds well to both direct and indirect reins, is to ride one-handed with the snaffle bit. This isn’t a huge transition—I’ve been riding with my hands close enough together that the change is barely perceptible. I just close that gap.
Once again on a circle to the right, I lay my left rein on her neck, and she follows through to the right. My hand is just a little bit to the right of her mane line. If I find that she’s struggling with the neck-rein cue, I go back to riding two-handed.
Bridle, Romal Reins
My West Coast roots make Vaquero training traditions a big part of my program. I put all of my horses in romal reins with a bridle before split reins. Some of the horses won’t ever go with split reins, depending on their jobs.
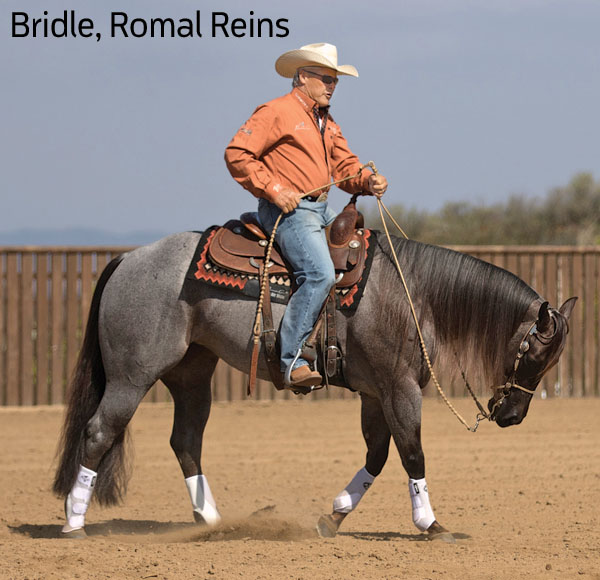
But tradition isn’t the only reason I use romals. I find that I stay truer to myself and get my horses better broke by using romals. I can’t run my fingers up and down the reins or ride with fingers between the reins in romals like I can with split reins. The bottom line is I can’t cheat myself or my horse’s training, which makes for a better foundation and responsive steering down the line.
[READ ABOUT: Romal Reins]
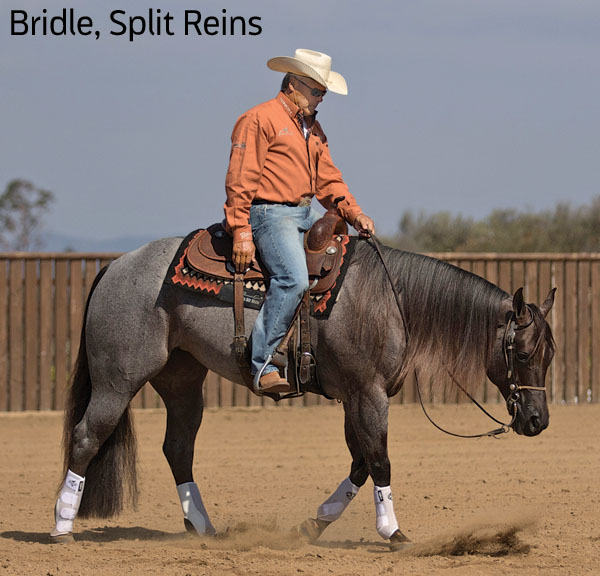
Bridle, Split Reins
The biggest difference between romal and split reins is that you can hold your hand lower with splits. My hand is just above her neck in the top-right photo, for a very subtle, quiet cue. This lets my mare relax and find her comfort zone for getting in frame. For horses, comfort equals confidence and willingness, which means they’ll do just about any maneuver or task you could request. The key to get to this point of excellent frame and response requires repetition day in and day out, as well as progressing at your horse’s pace rather than rushing.